프로필 추가 정보에 대한 정보
프로필 추가 정보를 만들어 GitHub 커뮤니티와 자신에 대한 정보를 공유할 수 있습니다. GitHub는 프로필 페이지의 맨 위에 프로필 추가 정보를 표시합니다.
사용자가 프로필 추가 정보에 포함할 정보를 결정하므로 GitHub에서 자신을 표현하는 방법을 완전히 제어할 수 있습니다. 다음은 방문자가 프로필 추가 정보에서 흥미롭거나 재미있거나 유용하다고 느낄 수 있는 정보의 몇 가지 예입니다.
- 사용자의 작업과 관심사를 설명하는 “내 정보” 섹션
- 자랑스럽게 여기는 기여와 해당 기여에 대한 컨텍스트
- 참여하는 커뮤니티에서 도움을 받기 위한 지침

GitHub Flavored Markdown을 사용하여 프로필 추가 정보에서 텍스트에 서식을 지정하고 이모지, 이미지 및 GIF를 포함할 수 있습니다. 자세한 내용은 GitHub에서 작성 및 포맷 시작을(를) 참조하세요. 프로필 추가 정보 사용자 비벙에 대한 실습 가이드는 GitHub에서 쓰기 위한 빠른 시작을(를) 참조하세요.
필수 조건
GitHub은(는) 다음이 모두 true이면 프로필 페이지에 프로필 추가 정보가 표시됩니다.
- GitHub 사용자 이름과 일치하는 이름의 리포지토리를 만들었습니다.
- 리포지토리는 퍼블릭입니다.
- 리포지토리에는 루트에 README.md라는 파일이 포함되어 있습니다.
- README.md 파일에는 모든 콘텐츠가 포함됩니다.
참고 항목
2020년 7월 이전에 사용자 이름과 동일한 이름의 퍼블릭 리포지토리를 만든 경우 GitHub는 프로필에 리포지토리의 추가 정보를 자동으로 표시하지 않습니다. GitHub의 리포지토리로 이동하고 프로필에 공유를 클릭하여 리포지토리의 추가 정보를 프로필에 수동으로 공유할 수 있습니다.
프로필 추가 정보 추가
-
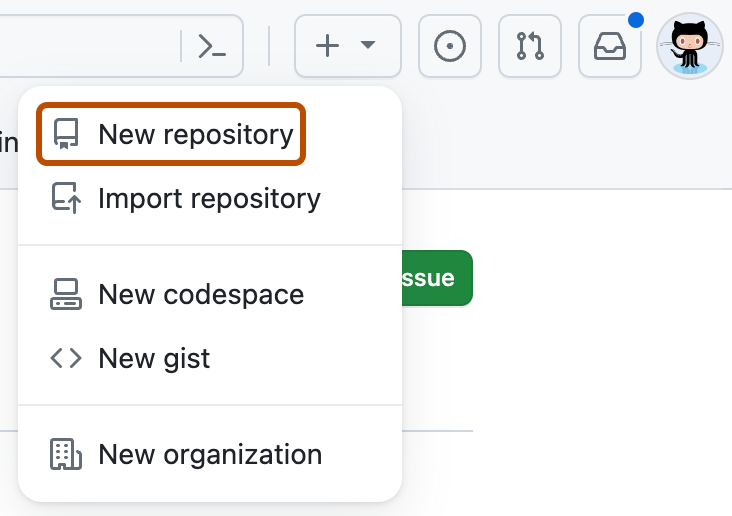
임의 페이지의 오른쪽 위에 있는 을(를) 클릭한 다음, 신규 리포지토리를 클릭합니다.
-
“리포지토리 이름”에 GitHub 사용자 이름과 일치하는 리포지토리 이름을 입력합니다. 예를 들어 사용자 이름이 “octocat”인 경우 리포지토리 이름은 “octocat”이어야 합니다.
-
필요에 따라 ‘설명’ 필드에 리포지토리 설명을 입력합니다. (예: “내 개인 리포지토리”)
-
퍼블릭을 선택합니다.
-
추가 정보를 사용하여 이 리포지토리 초기화를 선택합니다.
-
Create repository(리포지토리 만들기)를 클릭합니다.
-
오른쪽 사이드바 위에서 추가 정보 편집을 클릭합니다.

생성된 추가 정보 파일은 프로필 추가 정보에 영감을 주기 위해 템플릿으로 미리 채워집니다.
사용 가능한 모든 이모지 및 해당 코드에 대한 요약을 보려면 이모지 차트 시트를 참조하세요.
프로필 추가 정보 제거
다음 중 하나라도 적용되는 경우 프로필 추가 정보가 GitHub 프로필에서 제거됩니다.
- 추가 정보 파일이 제거되거나 비어 있습니다.
- 리포지토리가 프라이빗입니다.
- 리포지토리 이름은 이름 중 하나 또는 둘 다가 변경되어 더 이상 사용자 이름과 일치하지 않습니다.
선택하는 방법은 필요에 따라 달라지지만 확실하지 않은 경우 리포지토리를 프라이빗으로 만드는 것이 좋습니다. 리포지토리를 비공개로 만드는 방법에 대한 단계는 리포지토리 표시 유형 설정을(를) 참조하세요.