Remarque
Le nom de votre profil pour votre compte GitHub est obligatoire. Toutes les autres informations de profil décrites dans cet article sont facultatives.
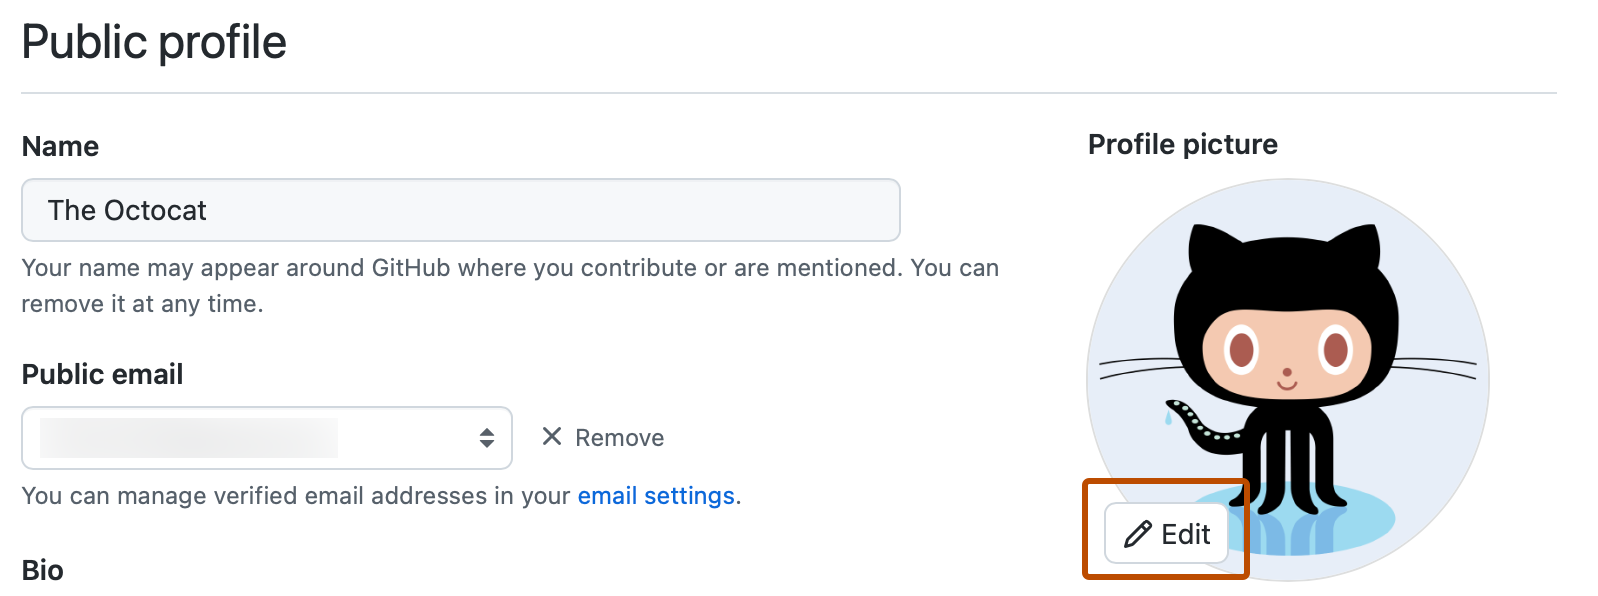
Changement de votre image de profil
Votre image de profil vous aide à vous GitHub identifier dans les demandes de tirage, les commentaires, les pages de contributions et les graphiques.
Définition d’une image de profil
-
Dans le coin supérieur droit de n’importe quelle page sur GitHub, cliquez sur votre photo de profil, puis sur Paramètres.
-
Sous « Image de profil », sélectionnez Modifier, puis cliquez sur Charger une photo....
-
Sélectionnez une image, puis cliquez sur Charger.
-
Rognez votre image.
-
Cliquez sur Définir une nouvelle image de profil.

Réinitialisation de votre image de profil à l’identicon
-
Dans le coin supérieur droit de n’importe quelle page sur GitHub, cliquez sur votre photo de profil, puis sur Paramètres.
-
Sous « Image de profil », sélectionnez Modifier, puis cliquez sur Supprimer la photo pour revenir à votre identicon.
Si votre adresse e-mail est associée à un Gravatar, vous ne pouvez pas revenir à votre identicon. Cliquez sur Restaurer Gravatar à la place.
Modification du nom de votre profil
Votre GitHub nom de profil n’a pas besoin de mettre en corrélation votre identité réelle.
- Dans le coin supérieur droit de n’importe quelle page sur GitHub, cliquez sur votre photo de profil, puis sur Paramètres.
- Sous « Profil public », dans le champ « Nom », tapez le nom que vous souhaitez afficher sur votre profil.
Ajout d’une bio à votre profil
-
Dans le coin supérieur droit de n’importe quelle page sur GitHub, cliquez sur votre photo de profil, puis sur Paramètres.
-
Sous « Profil public », dans le champ « Bio », tapez le contenu que vous souhaitez afficher sur votre profil. Le champ bio est limité à 160 caractères.
Conseil
Lorsque vous @mention une organisation, l’autocomplétion sera effectuée uniquement pour celles dont vous êtes membre. Vous pouvez toujours @mention des organisations dont vous n’êtes pas membre, comme un employeur précédent, mais le nom de l’organisation ne sera pas automatiquement renseigné pour vous.
-
Cliquez sur Mettre à jour le profil.
Ajout de pronoms à votre profil
Ajoutez vos pronoms à votre profil utilisateur public pour partager des informations sur vous-même avec d’autres GitHub utilisateurs.
-
Dans le coin supérieur droit de n’importe quelle page sur GitHub, cliquez sur votre photo de profil, puis sur Paramètres.
-
Sous Pronoms, ajoutez les pronoms que vous souhaitez afficher sur votre profil. Vous pouvez ajouter des pronoms personnalisés.
-
Cliquez sur Mettre à jour le profil.
Définition de votre localisation et de votre fuseau horaire
- Dans le coin supérieur droit de n’importe quelle page sur GitHub, cliquez sur votre photo de profil, puis sur Paramètres.
- Sous « Profil public », dans le champ « Emplacement », tapez l’emplacement que vous souhaitez afficher sur votre profil.
- Si vous le souhaitez, affichez l’heure locale actuelle sur votre profil.
- Sélectionnez Afficher l’heure locale actuelle.
- Sélectionnez le menu déroulant Fuseau horaire, puis cliquez sur votre fuseau horaire local.
- Cliquez sur Mettre à jour le profil.
Ajout de liens vers vos comptes sociaux
Vous pouvez ajouter jusqu’à quatre liens vers des comptes sociaux dans votre profil.
- Dans le coin supérieur droit de n’importe quelle page sur GitHub, cliquez sur votre photo de profil, puis sur Paramètres.
- Sous « Comptes sociaux », dans un champ vide « Lien vers le profil social », tapez l’URL complète du compte social. Par exemple, pour le
@GitHubcompte X (anciennement Twitter), tapezhttps://x.com/github. - Cliquez sur Mettre à jour le profil.
Ajout de votre ID ORCID à votre profil
Si vous êtes chercheur avec un ID ORCID, vous pouvez vous identifier en ajoutant votre ID ORCID à votre profil.
- Dans le coin supérieur droit de n’importe quelle page sur GitHub, cliquez sur votre photo de profil, puis sur Paramètres.
- Sous « ORCID iD », cliquez sur Connecter votre ID ORCID.
- Suivez les étapes pour vous connecter à votre compte ORCID, puis revenez à GitHub.
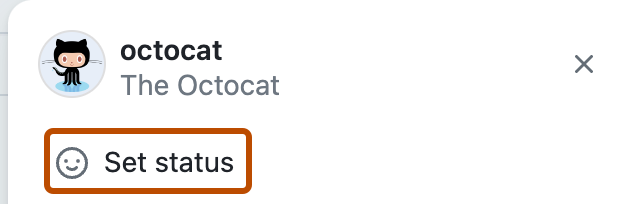
Définition d’un état
Vous pouvez définir un statut pour afficher des informations sur votre disponibilité actuelle.
-
Dans le coin supérieur droit de GitHub, cliquez sur votre image de profil, puis cliquez sur Définir l’état ou, si vous disposez déjà d’un ensemble d’états, cliquez sur votre état actuel.
-
Dans la zone « Quoi de neuf », tapez un message d’état.
-
Si vous le souhaitez, pour définir un état d’emoji, cliquez , puis cliquez sur un emoji dans la liste.
-
Si vous souhaitez préciser que votre disponibilité est limitée, sélectionnez « Occupé ».
-
Sélectionnez le menu déroulant Expiration , puis cliquez lorsque vous souhaitez que votre état expire. Si vous ne sélectionnez pas d’expiration d’état, votre état est maintenu jusqu’à ce que vous l’effaciez ou le modifiiez.
-
Sélectionnez le menu déroulant Visible pour, puis cliquez sur les personnes à qui vous voulez que votre état soit visible. Si vous ne sélectionnez pas d’organisation, votre statut sera public.
-
Cliquez sur Définir le statut.

Étapes suivantes
- Utilisez le guide des emoji et le guide Markdown pour expérimenter des options de mise en forme supplémentaires.
- Pour en savoir plus sur les profils GitHub, consultez À propos de votre profil.
- Pour obtenir des informations de référence, consultez Informations de référence sur le profil.
- Pour plus d’informations sur la personnalisation du profil, consultez Guide pratique pour votre compte et votre profil GitHub.