注意
For an overview of Copilot云代理, see 关于 GitHub Copilot 云代理.
Introduction
You can start Copilot云代理 from:
- GitHub Issues, by assigning an issue to Copilot
- The agents tab or panel on GitHub
- The dashboard on GitHub
- 副驾驶聊天 in Visual Studio Code, JetBrains IDEs, Eclipse and Visual Studio 2026
- 副驾驶聊天 on GitHub.com
- The GitHub CLI
- On GitHub Mobile
- Your preferred IDE or agentic coding tool with Model Context Protocol (MCP) support
- The Raycast launcher
- The "New repository" form on GitHub
- Jira
- Slack
- Microsoft Teams
- Azure Boards
- Linear
Copilot will start working on the task in the background. Some entry points open a pull request automatically. In other cases, you can prompt Copilot to open a pull request, or create a pull request when Copilot finishes work, from the session logs.
For more information, see 关于 GitHub Copilot 云代理.
Assigning an issue to Copilot
You can ask Copilot to start working on an issue by assigning the issue to Copilot.
Copilot will start working on the task, raise a pull request, then request a review from you when it's finished working
You can assign an issue to Copilot:
- On GitHub.com (see the next section)
- On GitHub Mobile
- Via the GitHub API (see later in this article)
- Using the Raycast launcher
- Using GitHub CLI (see
gh issue edit)
Assigning an issue to Copilot on GitHub.com
注意
This feature is in 公共预览版 and subject to change.
-
在 GitHub 上,导航到存储库的主页面。
-
在仓库名称下,单击 “Issues”****。

-
Open the issue that you want to assign to Copilot.
-
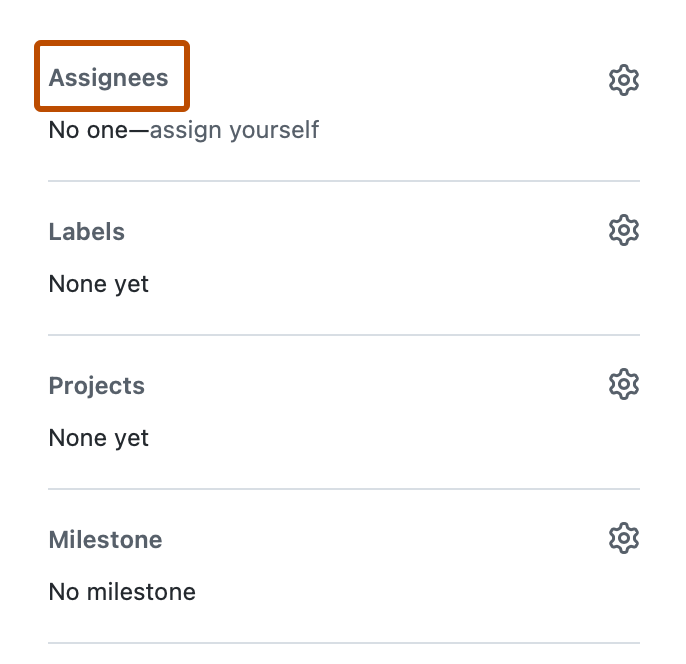
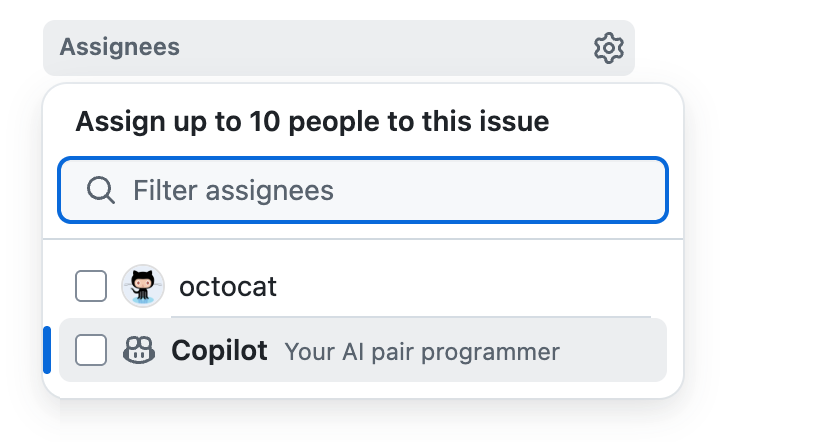
In the right side menu, click Assignees.
-
Click Copilot from assignees list.
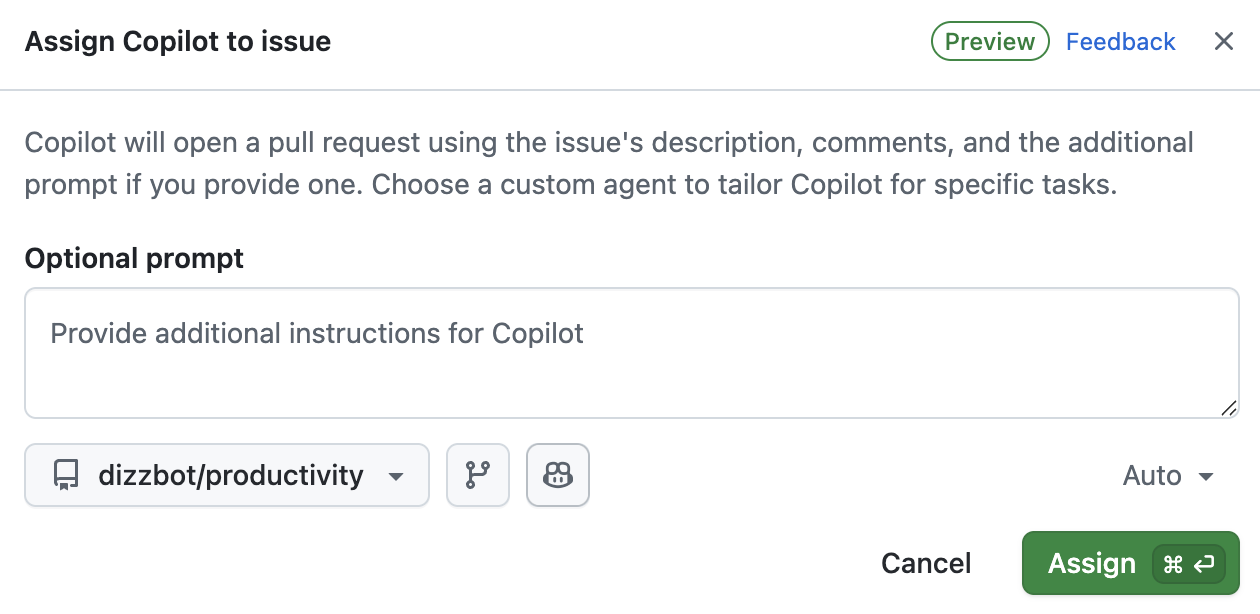
Additional options are displayed.
-
In the Optional prompt field you can add specific guidance for Copilot. Add any context, constraints, or specific requirements that will help Copilot to understand and complete the task.
For example, you might include instructions about specific coding patterns or frameworks to use, testing requirements, code style preferences, files or directories that should or shouldn't be modified.
In addition to the details you supply here, Copilot will use any custom instructions that have been configured for the target repository. See 为GitHub Copilot添加存储库自定义说明.
-
You can use the dropdown menus in the dialog to change the repository that Copilot will work in and the branch that it will branch off from.
All repositories where you have at least read access will be displayed in the repository dropdown menu. However, you can only select a repository if you have write access to it, and if Copilot云代理 is enabled for that repository.
If you select a repository in a different organization than the issue's source organization, or if you select a public repository when the issue is in a private repository, a warning will be displayed.
If you don't specify a repository, Copilot will work in the same repository as the issue. If you don't specify a branch, Copilot will work from the default branch of the selected repository.
提示
When you assign an issue to Copilot, it gets sent the issue title, description, any comments that currently exist, and any additional instructions you provide. After assigning the issue, Copilot will not be aware of, and therefore won't react to, any further comments that are added to the issue. If you have more information, or changes to the original requirement, add this as a comment in the pull request that Copilot raises.
-
(可选)如果您想分配一个代理或一个具有专用行为和工具的,可以单击自定义智能体以打开代理下拉菜单。 可以从存储库、组织或企业中选择现有 自定义智能体。 还可以单击“创建代理”,在所选存储库和分支中创建新的代理资料代理。 有关详细信息,请参阅“为Copilot云代理创建自定义代理”。
注意
第三方编码代理可用于GitHub Copilot Pro+和Copilot Enterprise计划。
-
(可选)可以使用下拉菜单来选择将使用的 Copilot 模型。 有关详细信息,请参阅“更改 GitHub Copilot 云代理的 AI 模型”。


You can also assign issues to Copilot from other places on GitHub.com:
- From the list of issues on a repository's Issues page.
- When viewing an issue in GitHub 项目.
Assigning an issue to Copilot on GitHub Mobile
- In GitHub Mobile, navigate to the repository that contains the issue you want to assign to Copilot.
- Click Issues.
- Open the issue that you want to assign to Copilot.
- Tap the icon.
- Beside "Assignees", tap Edit.
- Beside "Copilot", click the plus sign.
- Click Done.
Assigning an issue to Copilot via the GitHub API
注意
This feature is in 公共预览版 and subject to change.
You can assign issues to Copilot using either the GraphQL API or the REST API. Both APIs support an optional Agent Assignment input to customize the task:
| GraphQL parameter | REST parameter | Description |
|---|---|---|
targetRepositoryId | target_repo | The repository where Copilot will work |
baseRef | base_branch | The branch that Copilot will branch from |
customInstructions | custom_instructions | Additional instructions for Copilot |
customAgent | custom_agent | A 自定义智能体 to use for the task |
model | model | The model for Copilot to use |
Using the GraphQL API
注意
You must include the GraphQL-Features header with the values issues_copilot_assignment_api_support and coding_agent_model_selection.
You can use the following GraphQL mutations to assign issues to Copilot:
Creating and assigning a new issue
-
Make sure you're authenticating with the API using a user token, for example a personal access token or a GitHub App user-to-server token.
注意
If using a fine-grained personal access token, it needs the following permissions to assign Copilot to an issue:
- Read access to metadata
- Read and write access to actions, contents, issues and pull requests
If using a personal access token (classic), it needs the
reposcope to assign Copilot to an issue. -
Verify that Copilot云代理 is enabled in the repository by checking if the repository's
suggestedActorsin the GraphQL API includes Copilot. Replaceocto-orgwith the repository owner, andocto-repowith the repository name.GraphQL query { repository(owner: "octo-org", name: "octo-repo") { suggestedActors(capabilities: [CAN_BE_ASSIGNED], first: 100) { nodes { login __typename ... on Bot { id } ... on User { id } } } } }query { repository(owner: "octo-org", name: "octo-repo") { suggestedActors(capabilities: [CAN_BE_ASSIGNED], first: 100) { nodes { login __typename ... on Bot { id } ... on User { id } } } } }If Copilot云代理 is enabled for the user and in the repository, the first node returned from the query will have the
loginvaluecopilot-swe-agent. -
Make a note of the
idvalue of this login. -
Fetch the GraphQL global ID of the repository you want to create the issue in, replacing
octo-orgwith the repository owner, andocto-repowith the repository name.GraphQL query { repository(owner: "octo-org", name: "octo-repo") { id } }query { repository(owner: "octo-org", name: "octo-repo") { id } } -
Create the issue with the
createIssuemutation. ReplaceREPOSITORY_IDwith the ID returned from the previous step, andBOT_IDwith the ID returned from the step before that. You can optionally include theagentAssignmentinput to customize the task.Shell gh api graphql -f query='mutation { createIssue(input: { repositoryId: "REPOSITORY_ID", title: "Implement comprehensive unit tests", body: "DETAILS", assigneeIds: ["BOT_ID"], agentAssignment: { targetRepositoryId: "REPOSITORY_ID", baseRef: "main", customInstructions: "Add comprehensive test coverage", customAgent: "", model: "" } }) { issue { id title assignees(first: 10) { nodes { login } } } } }' -H 'GraphQL-Features: issues_copilot_assignment_api_support,coding_agent_model_selection'gh api graphql -f query='mutation { createIssue(input: { repositoryId: "REPOSITORY_ID", title: "Implement comprehensive unit tests", body: "DETAILS", assigneeIds: ["BOT_ID"], agentAssignment: { targetRepositoryId: "REPOSITORY_ID", baseRef: "main", customInstructions: "Add comprehensive test coverage", customAgent: "", model: "" } }) { issue { id title assignees(first: 10) { nodes { login } } } } }' -H 'GraphQL-Features: issues_copilot_assignment_api_support,coding_agent_model_selection'
Assigning an existing issue
-
Make sure you're authenticating with the API using a user token, for example a personal access token or a GitHub App user-to-server token.
-
Verify that Copilot云代理 is enabled in the repository by checking if the repository's
suggestedActorsin the GraphQL API includes Copilot. Replaceocto-orgwith the repository owner, andocto-repowith the repository name.GraphQL query { repository(owner: "monalisa", name: "octocat") { suggestedActors(capabilities: [CAN_BE_ASSIGNED], first: 100) { nodes { login __typename ... on Bot { id } ... on User { id } } } } }query { repository(owner: "monalisa", name: "octocat") { suggestedActors(capabilities: [CAN_BE_ASSIGNED], first: 100) { nodes { login __typename ... on Bot { id } ... on User { id } } } } }If Copilot云代理 is enabled for the user and in the repository, the first node returned from the query will have the
loginvaluecopilot-swe-agent. -
Fetch the GraphQL global ID of the issue you want to assign to Copilot, replacing
monalisawith the repository owner,octocatwith the name and9000with the issue number.GraphQL query { repository(owner: "monalisa", name: "octocat") { issue(number: 9000) { id title } } }query { repository(owner: "monalisa", name: "octocat") { issue(number: 9000) { id title } } } -
Assign the existing issue to Copilot using the
replaceActorsForAssignablemutation. ReplaceISSUE_IDwith the ID returned from the previous step,BOT_IDwith the ID returned from the step before that, andREPOSITORY_IDwith the repository ID. You can optionally include theagentAssignmentinput to customize the task.Shell gh api graphql -f query='mutation { replaceActorsForAssignable(input: { assignableId: "ISSUE_ID", actorIds: ["BOT_ID"], agentAssignment: { targetRepositoryId: "REPOSITORY_ID", baseRef: "main", customInstructions: "Fix the reported bug", customAgent: "", model: "" } }) { assignable { ... on Issue { id title assignees(first: 10) { nodes { login } } } } } }' -H 'GraphQL-Features: issues_copilot_assignment_api_support,coding_agent_model_selection'gh api graphql -f query='mutation { replaceActorsForAssignable(input: { assignableId: "ISSUE_ID", actorIds: ["BOT_ID"], agentAssignment: { targetRepositoryId: "REPOSITORY_ID", baseRef: "main", customInstructions: "Fix the reported bug", customAgent: "", model: "" } }) { assignable { ... on Issue { id title assignees(first: 10) { nodes { login } } } } } }' -H 'GraphQL-Features: issues_copilot_assignment_api_support,coding_agent_model_selection' -
Alternatively, you can use the
updateIssuemutation to update an existing issue and assign it to Copilot. ReplaceISSUE_IDwith the issue ID andBOT_IDwith the bot ID.Shell gh api graphql -f query='mutation { updateIssue(input: { id: "ISSUE_ID", assigneeIds: ["BOT_ID"], agentAssignment: { targetRepositoryId: "REPOSITORY_ID", baseRef: "main", customInstructions: "Update feature implementation", customAgent: "", model: "" } }) { issue { id title assignees(first: 10) { nodes { login } } } } }' -H 'GraphQL-Features: issues_copilot_assignment_api_support,coding_agent_model_selection'gh api graphql -f query='mutation { updateIssue(input: { id: "ISSUE_ID", assigneeIds: ["BOT_ID"], agentAssignment: { targetRepositoryId: "REPOSITORY_ID", baseRef: "main", customInstructions: "Update feature implementation", customAgent: "", model: "" } }) { issue { id title assignees(first: 10) { nodes { login } } } } }' -H 'GraphQL-Features: issues_copilot_assignment_api_support,coding_agent_model_selection' -
You can also use the
addAssigneesToAssignablemutation to add Copilot to an existing issue while keeping other assignees. ReplaceISSUE_IDwith the issue ID andBOT_IDwith the bot ID.Shell gh api graphql -f query='mutation { addAssigneesToAssignable(input: { assignableId: "ISSUE_ID", assigneeIds: ["BOT_ID"], agentAssignment: { targetRepositoryId: "REPOSITORY_ID", baseRef: "main", customInstructions: "Collaborate on this task", customAgent: "", model: "" } }) { assignable { ... on Issue { id title assignees(first: 10) { nodes { login } } } } } }' -H 'GraphQL-Features: issues_copilot_assignment_api_support,coding_agent_model_selection'gh api graphql -f query='mutation { addAssigneesToAssignable(input: { assignableId: "ISSUE_ID", assigneeIds: ["BOT_ID"], agentAssignment: { targetRepositoryId: "REPOSITORY_ID", baseRef: "main", customInstructions: "Collaborate on this task", customAgent: "", model: "" } }) { assignable { ... on Issue { id title assignees(first: 10) { nodes { login } } } } } }' -H 'GraphQL-Features: issues_copilot_assignment_api_support,coding_agent_model_selection'
Using the REST API
You can use the following REST API endpoints to assign issues to Copilot:
Adding assignees to an existing issue
gh api \
  --method POST \
  -H "Accept: application/vnd.github+json" \
  -H "X-GitHub-Api-Version: 2022-11-28" \
  /repos/OWNER/REPO/issues/ISSUE_NUMBER/assignees \
  --input - <<< '{
  "assignees": ["copilot-swe-agent[bot]"],
  "agent_assignment": {
    "target_repo": "OWNER/REPO",
    "base_branch": "main",
    "custom_instructions": "",
    "custom_agent": "",
    "model": ""
  }
}'
Creating a new issue
gh api \
  --method POST \
  -H "Accept: application/vnd.github+json" \
  -H "X-GitHub-Api-Version: 2022-11-28" \
  /repos/OWNER/REPO/issues \
  --input - <<< '{
  "title": "Issue title",
  "body": "Issue description.",
  "assignees": ["copilot-swe-agent[bot]"],
  "agent_assignment": {
    "target_repo": "OWNER/REPO",
    "base_branch": "main",
    "custom_instructions": "",
    "custom_agent": "",
    "model": ""
  }
}'
Updating an existing issue
gh api \
  --method PATCH \
  -H "Accept: application/vnd.github+json" \
  -H "X-GitHub-Api-Version: 2022-11-28" \
  /repos/OWNER/REPO/issues/ISSUE_NUMBER \
  --input - <<< '{
  "assignees": ["copilot-swe-agent[bot]"],
  "agent_assignment": {
    "target_repo": "OWNER/REPO",
    "base_branch": "main",
    "custom_instructions": "",
    "custom_agent": "",
    "model": ""
  }
}'
Assigning an issue to Copilot from Raycast
Raycast 是适用于 Windows 和 macOS 的可扩展启动器。 GitHub Copilot使用 Raycast 的扩展,您可以在您的计算机上随时随地启动和跟踪Copilot云代理任务,并实时观看会话日志。
-
从 Raycast 网站安装 Raycast。
-
GitHub Copilot单击**扩展页上的**“[安装扩展](https://www.raycast.com/github/github-copilot)”按钮,安装 Raycast 的扩展。 -
Open Raycast, search for "Copilot," find the Assign Issues to Copilot command, then press Enter.
-
Click Sign in with GitHub, then complete the authentication flow. Raycast will re-open.
-
Select the repository you want Copilot to work in.
-
Select the issue you want to assign to Copilot.
-
Optionally, select a base branch for Copilot's pull request. Copilot will create a new branch based on this branch, then push the changes to a pull request targeting that branch.
-
(可选)从下拉菜单中选择具有专用行为和工具的 自定义智能体。 有关详细信息,请参阅“为Copilot云代理创建自定义代理”。
-
(可选)可以使用下拉菜单来选择将使用的 Copilot 模型。 有关详细信息,请参阅“更改 GitHub Copilot 云代理的 AI 模型”。
-
Optionally, provide additional instructions. These will be passed to Copilot alongside your issue contents.
-
Press Command+Enter (macOS) or Ctrl+Enter (Windows) to assign the issue.
Copilot will start a new session. Copilot will work on the task and push changes to its pull request, then add you as a reviewer when it has finished, triggering a notification.
注意
如果在启动任务时无法选择特定存储库,则拥有该存储库的组织可能已启用 OAuth app 访问限制。 要了解如何请求批准“GitHub Copilot for Raycast” OAuth app,请参阅 请求组织批准 OAuth 应用。
Asking Copilot to start work from the agents tab or panel
You can ask start sessions from the agents tab and the agents panel. The only difference is the entry point - once you see the "New agent task" form, the steps are the same.
-
打开代理面板或选项卡:
- 在存储库中打开 Agents 选项卡。
- 导航到智能体页面****:转到 github.com/copilot/agents。 你也可以通过打开智能体面板,然后单击“View all”进入此页面****。
- 打开智能体面板****:单击 GitHub 右上角导航栏中的 。
-
使用提示字段中的下拉菜单,选择要使用的存储库 Copilot 。
-
键入描述请求的提示。 还可以通过粘贴、拖动或上传图像来添加视觉输入,例如屏幕截图或 UI 模型。 支持的文件:image/png、image/jpeg、image/gif、image/webp。
例如:
Create a pull request to implement a user friendly message for common errors. -
可选地为 Copilot 的拉取请求选择一个基分支。 Copilot 将基于此分支创建新分支,然后将更改推送到面向该分支的拉取请求。
-
(可选)如果您想分配一个代理或一个具有专用行为和工具的,可以单击自定义智能体以打开代理下拉菜单。 可以从存储库、组织或企业中选择现有 自定义智能体。 还可以单击“创建代理”,在所选存储库和分支中创建新的代理资料代理。 有关详细信息,请参阅“为Copilot云代理创建自定义代理”。
注意
第三方编码代理可用于GitHub Copilot Pro+和Copilot Enterprise计划。
-
(可选)可以使用下拉菜单来选择将使用的 Copilot 模型。 有关详细信息,请参阅“更改 GitHub Copilot 云代理的 AI 模型”。
-
单击 或按 Enter。
       Copilot 将启动一个新会话,该会话将显示在提示框下面的列表中。
       Copilot 将处理任务并将更改推送到其拉取请求中,任务完成后,它会将你添加为审阅者,并触发通知。
Asking Copilot to start work from the dashboard
You can ask Copilot to open a pull request from the Copilot prompt box in the dashboard. The dashboard is your personalized overview of your activity on GitHub, seen when you visit https://github.com while logged in.
-
Navigate to the dashboard at https://github.com.
-
Click the Task button.
-
Using the dropdown menu in the prompt field, select the repository you want Copilot to work in.
-
Type a prompt describing your request.
For example,
Implement a user friendly message for common errors.If you want Copilot to open a pull request, you can ask in your prompt, for example
Open a pull request to implement a user friendly message for common errors. -
Optionally, select a base branch for Copilot's pull request. Copilot will create a new branch based on this branch.
-
(可选)如果您想分配一个代理或一个具有专用行为和工具的,可以单击自定义智能体以打开代理下拉菜单。 可以从存储库、组织或企业中选择现有 自定义智能体。 还可以单击“创建代理”,在所选存储库和分支中创建新的代理资料代理。 有关详细信息,请参阅“为Copilot云代理创建自定义代理”。
注意
第三方编码代理可用于GitHub Copilot Pro+和Copilot Enterprise计划。
-
Click Send now or press Return.
You will be taken to the agents tab, and Copilot will start a new session, which will appear in the "Recent sessions" list below the prompt box. Copilot will work on the task and push any code changes.
注意
If you have enabled the New Dashboard Experience in feature preview, the new session will appear in "Agent sessions" under the prompt box in your dashboard. For more information, see 个人仪表板.
Asking Copilot to create a pull request from 副驾驶聊天 in Visual Studio Code
-
Install the GitHub Pull Requests extension for Visual Studio Code.
-
Open GitHub Copilot 聊天功能 in Visual Studio Code.
-
Type a prompt explaining what you want Copilot to do.
For example,
Put backticks around file names and variables in output提示
To help Copilot, you can select the relevant line(s) of code before submitting your prompt.
-
Submit your prompt by clicking the Delegate this task to the GitHub Copilot cloud agent button, next to the Send button
-
If you have local changes, a dialog will be displayed asking if you want to push those changes so Copilot can start from your current state. Click Include changes to push your changes, or Ignore changes to ask Copilot to start its work from your repository's default branch.
Copilot will start a new session and respond with a link to the pull request it creates. It will work on the task and push changes to the pull request, and then add you as a reviewer when it has finished, triggering a notification.
Asking Copilot to create a pull request from 副驾驶聊天 in JetBrains IDEs
注意
Copilot云代理 in JetBrains IDEs is in 公共预览版, and subject to change.
-
Open GitHub Copilot 聊天功能 in your JetBrains IDE.
-
Type a prompt explaining what you want Copilot to do
For example,
Put backticks around file names and variables in output -
Click the Delegate to Cloud Agent button next to the Send button.
Copilot will start a new session and respond with a link to the pull request it creates. It will work on the task and push changes to the pull request, and then add you as a reviewer when it has finished, triggering a notification from GitHub and in the IDE.
Asking Copilot to create a pull request from 副驾驶聊天 in Eclipse
注意
Copilot云代理 in Eclipse is in 公共预览版, and subject to change.
-
Open GitHub Copilot 聊天功能 in Eclipse.
-
Type a prompt explaining what you want Copilot to do.
For example,
Put backticks around file names and variables in output -
Click next to the Send button.
-
In the dialog box that opens, select the repository you want Copilot to work in, then click Continue.
Copilot will start a new session and respond with a link to the pull request it creates. It will work on the task and push changes to the pull request, and then add you as a reviewer when it has finished, triggering a notification from GitHub and in the IDE.
Asking Copilot to create a pull request from 副驾驶聊天 in Visual Studio 2026
注意
To use Copilot云代理 in Visual Studio, you'll need to be running at least December Update 18.1.0 of Visual Studio 2026.
-
Enable Copilot云代理 support in Visual Studio.
- Open the Tools menu, then click Options.
- In the sidebar, select GitHub.
- Check the Enable Copilot Cloud agent (preview) box.
- Restart Visual Studio.
-
Open GitHub Copilot 聊天功能 in Visual Studio.
-
Enter a prompt, giving details of what you want Copilot to change.
For example,
Put backticks around file names and variables in log output. -
Submit your prompt by clicking the Delegate this task to the GitHub Copilot cloud agent button, next to the Send button.
Copilot asks you to confirm that you want to use the cloud agent to create a pull request.
-
Click Confirm.
Copilot will start a new session and respond with a link to the pull request it creates. It will work on the task and push changes to the pull request, and then add you as a reviewer when it has finished, triggering a notification.
Asking Copilot to create a pull request from 副驾驶聊天 in GitHub.com
-
Open GitHub Copilot 聊天功能 on GitHub.com.
-
Type
/taskto ask Copilot to create a pull request, and give details of what you want Copilot to change.For example,
/task Create a pull request to put backticks around file names and variables in output. -
Optionally, select a base branch for Copilot's pull request. Copilot will create a new branch based on this branch, then push the changes to a pull request targeting that branch.
-
(可选)如果您想分配一个代理或一个具有专用行为和工具的,可以单击自定义智能体以打开代理下拉菜单。 可以从存储库、组织或企业中选择现有 自定义智能体。 还可以单击“创建代理”,在所选存储库和分支中创建新的代理资料代理。 有关详细信息,请参阅“为Copilot云代理创建自定义代理”。
注意
第三方编码代理可用于GitHub Copilot Pro+和Copilot Enterprise计划。
-
Click or press Enter.
Copilot will start a new session, which will appear in the list below the prompt box. Copilot will work on the task and push changes to its pull request, then add you as a reviewer when it has finished, triggering a notification.
Asking Copilot to start work from GitHub Mobile
-
In GitHub Mobile, tap the icon in the bottom right corner of the screen, then tap New Session.
-
Using the dropdown menu in the prompt field, select the repository you want Copilot to work in.
-
Enter a prompt describing your request.
For example:
Implement a user friendly message for common errors..If you want Copilot to open a pull request, you can ask in your prompt, for example
Open a pull request to implement a user friendly message for common errors. -
Optionally, select a base branch for Copilot's changes. Copilot will create a new branch based on this branch.
-
(可选)从下拉菜单中选择具有专用行为和工具的 自定义智能体。 有关详细信息,请参阅“为Copilot云代理创建自定义代理”。
-
(可选)可以使用下拉菜单来选择将使用的 Copilot 模型。 有关详细信息,请参阅“更改 GitHub Copilot 云代理的 AI 模型”。
-
Click the submit button.
Copilot will start a new session, work on the task and push any code changes.
You can track Copilot's work and open a pull request in one click from the session logs. For more information, see 跟踪 GitHub Copilot 的会话.
Asking Copilot to create a pull request from the GitHub CLI
注意
The agent-task command set is only available in v2.80.0 or later of the GitHub CLI. This command set is a 公共预览版 and is subject to change.
You can start a new Copilot云代理 session with the gh agent-task create command in the GitHub CLI.
When you run the command without any arguments, you are asked to enter a prompt. Copilot云代理 acts on the prompt and opens a pull request in the current repository.
You can use command line options to:
- Provide the prompt (
gh agent-task create "Example prompt") - Choose a base branch, instead of using the repository's default branch (
--base) - Select a repository, instead of targeting the current repository (
--repo) - Follow the session log in real time (
--follow)
To see all of the available options, run gh agent-task create --help.
Asking Copilot to create a pull request from the GitHub MCP server
注意
- This capability is only available on the remote GitHub MCP server and host applications where remote MCP servers are supported.
-
Install the GitHub MCP server in your preferred IDE or agentic coding tool. See 在 IDE 中使用 GitHub MCP 服务器.
-
Ensure the
create_pull_request_with_copilottool is enabled. -
Open chat.
-
Type a prompt asking Copilot to create a pull request, with the details of what you want to change.
For example,
Open a PR in my repository to expand unit test coverage.提示
- You can ask Copilot to open a pull request using a specific branch as the base branch by including it in your prompt.
-
Submit your prompt.
Copilot will start a new session, open a draft pull request and work on the task in the background. As it works, it will push changes to the pull request, and once it has finished, it will add you as a reviewer. In most cases, the MCP host will show you the URL of the created pull request.
Asking Copilot to create a pull request from Raycast
Raycast 是适用于 Windows 和 macOS 的可扩展启动器。 GitHub Copilot使用 Raycast 的扩展,您可以在您的计算机上随时随地启动和跟踪Copilot云代理任务,并实时观看会话日志。
-
从 Raycast 网站安装 Raycast。
-
GitHub Copilot单击**扩展页上的**“[安装扩展](https://www.raycast.com/github/github-copilot)”按钮,安装 Raycast 的扩展。 -
Open Raycast, search for "Copilot," find the Create Task command, then press Enter.
-
Click Sign in with GitHub, then complete the authentication flow. Raycast will re-open.
-
Type a prompt describing what you want Copilot to do.
For example,
Implement a user friendly message for common errors. -
Select the repository you want Copilot to work in.
-
Optionally, select a base branch for Copilot's pull request. Copilot will create a new branch based on this branch, then push the changes to a pull request targeting that branch.
-
(可选)从下拉菜单中选择具有专用行为和工具的 自定义智能体。 有关详细信息,请参阅“为Copilot云代理创建自定义代理”。
-
(可选)可以使用下拉菜单来选择将使用的 Copilot 模型。 有关详细信息,请参阅“更改 GitHub Copilot 云代理的 AI 模型”。
-
Press Command+Enter (macOS) or Ctrl+Enter (Windows) to start the task.
Copilot will start a new session. Copilot will work on the task and push changes to its pull request, then add you as a reviewer when it has finished, triggering a notification.
注意
如果在启动任务时无法选择特定存储库,则拥有该存储库的组织可能已启用 OAuth app 访问限制。 要了解如何请求批准“GitHub Copilot for Raycast” OAuth app,请参阅 请求组织批准 OAuth 应用。
Asking Copilot to create a pull request from the "New repository" page
When creating a new repository, you can ask Copilot to seed the new repository by entering a prompt.
-
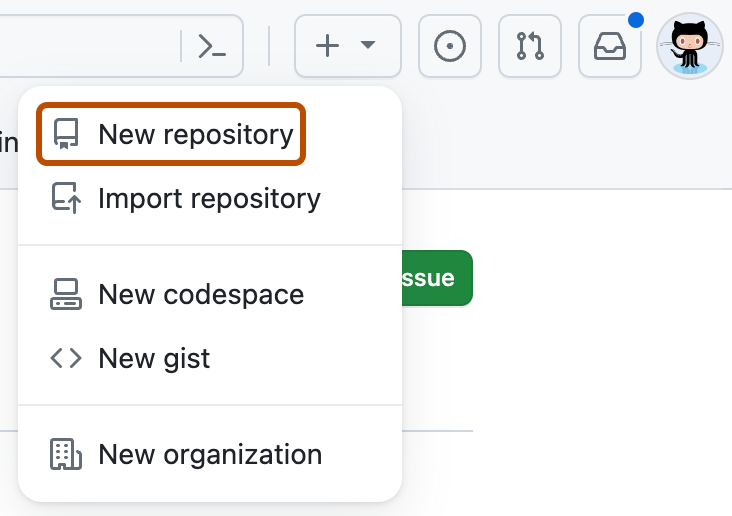
在任何页面的右上角,选择 ,然后单击“新建存储库”。
-
使用“所有者”下拉菜单选择你想要拥有存储库的帐户。

-
In the Prompt field, enter a prompt describing what you want Copilot to build.
For example,
Create a Rust CLI for converting CSV spreadsheets to Markdown -
单击“创建存储库”。
Copilot will immediately open a draft pull request. Copilot will work on the task and push changes to its pull request, then add you as a reviewer when it has finished, triggering a notification.


监视进度
可以从代理面板、Copilot等查看当前和过去的Visual Studio Code会话。 请参阅“跟踪 GitHub Copilot 的会话”。