Defining a custom pattern for a repository
Before defining a custom pattern, you must ensure that Secret Protection is enabled on your repository. For more information, see Enabling secret scanning for your repository.
-
On GitHub, navigate to the main page of the repository.
-
Under your repository name, click Settings. If you cannot see the "Settings" tab, select the dropdown menu, then click Settings.

-
In the "Security" section of the sidebar, click Advanced Security.
-
Under "Secret Protection", to the right of "Custom patterns", click New pattern.
-
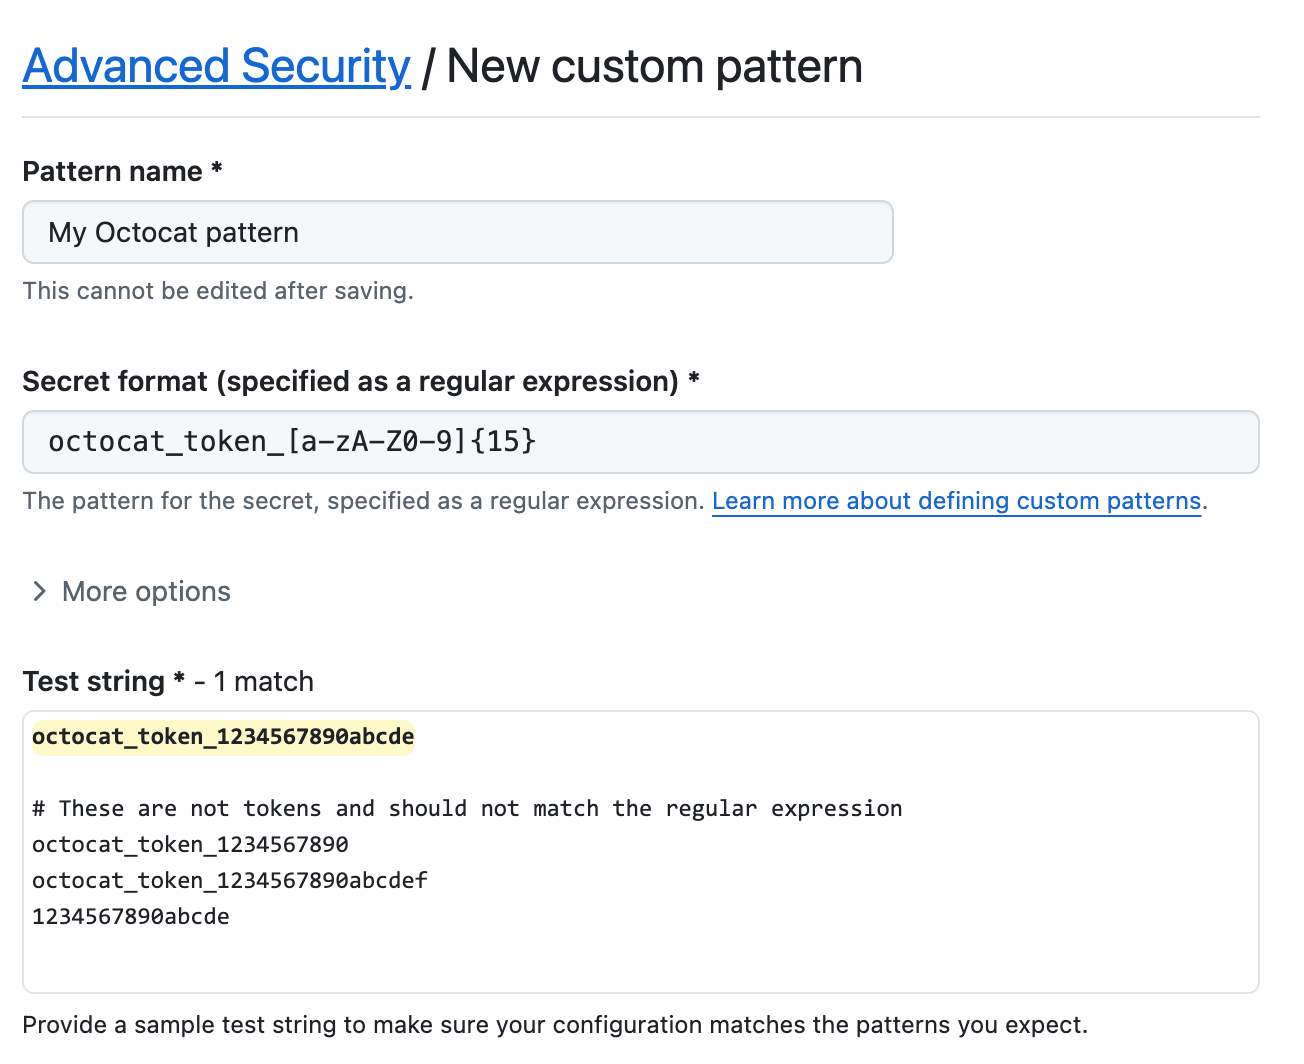
Enter the details for your new custom pattern. You must at least provide the name for your pattern, and a regular expression for the format of your secret pattern.
- In the "Pattern name" field, type a name for your pattern.
- In the "Secret format" field, type a regular expression for the format of your secret pattern.
- You can click More options to provide other surrounding content or additional match requirements for the secret format. See Custom patterns reference.
- Provide a sample test string to make sure your configuration is matching the patterns you expect.
-
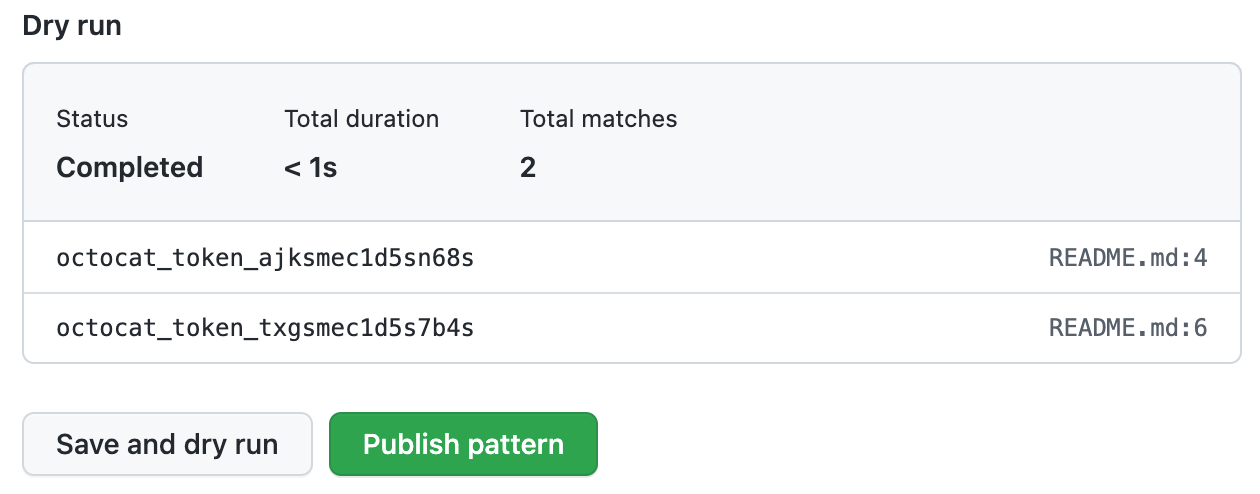
When you're ready to test your new custom pattern, to identify matches in the repository without creating alerts, click Save and dry run.
-
When the dry run finishes, you'll see a sample of results (up to 1000). Review the results and identify any false positive results.
-
Edit the new custom pattern to fix any problems with the results, then, to test your changes, click Save and dry run.
-
When you're satisfied with your new custom pattern, click Publish pattern.
-
Optionally, to enable push protection for your custom pattern, click Enable. For more information, see Push protection.
Note
The "Enable" button isn't available until after the dry run succeeds and you publish the pattern.


After your pattern is created, secret scanning scans for any secrets in your entire Git history on all branches present in your GitHub repository. For more information on viewing secret scanning alerts, see Manage secret scanning alerts.
Defining a custom pattern for an organization
Before defining a custom pattern, you must ensure that you enable secret scanning for the repositories that you want to scan in your organization. You can use security configurations to enable secret scanning on all repositories in your organization. For more information, see Enabling security features at scale.
-
In the upper-right corner of GitHub, click your profile picture, then click Organizations.
-
Select an organization by clicking on it.
-
Under your organization name, click Settings. If you cannot see the "Settings" tab, select the dropdown menu, then click Settings.

-
In the "Security" section of the sidebar, select the Advanced Security dropdown menu, then click Global settings.
-
Under "Custom patterns", click New pattern.
-
Enter the details for your new custom pattern. You must at least provide the name for your pattern, and a regular expression for the format of your secret pattern.
- In the "Pattern name" field, type a name for your pattern.
- In the "Secret format" field, type a regular expression for the format of your secret pattern.
- You can click More options to provide other surrounding content or additional match requirements for the secret format. See Custom patterns reference.
- Provide a sample test string to make sure your configuration is matching the patterns you expect.
-
When you're ready to test your new custom pattern, to identify matches in select repositories without creating alerts, click Save and dry run.
-
Select the repositories where you want to perform the dry run.
- To perform the dry run across the entire organization, select All repositories in the organization.
- To specify the repositories where you want to perform the dry run, select Selected repositories, then search for and select up to 10 repositories.
-
When you're ready to test your new custom pattern, click Run.
-
When the dry run finishes, you'll see a sample of results (up to 1000). Review the results and identify any false positive results.
-
Edit the new custom pattern to fix any problems with the results, then, to test your changes, click Save and dry run.
-
When you're satisfied with your new custom pattern, click Publish pattern.
-
Optionally, to enable push protection for your custom pattern, click Enable. For more information, see Push protection.
Note
- The option to enable push protection is visible for published patterns only.
- Push protection for custom patterns will only apply to repositories in your organization that have secret scanning as push protection enabled.
- Enabling push protection for commonly found custom patterns can be disruptive to contributors.

After your pattern is created, secret scanning scans for any secrets in repositories in your organization, including their entire Git history on all branches. Organization owners and repository administrators will be alerted to any secrets found and can review the alert in the repository where the secret is found. For more information on viewing secret scanning alerts, see Manage secret scanning alerts.
Defining a custom pattern for an enterprise account
Before defining a custom pattern, you must ensure that you enable secret scanning for your enterprise account. For more information, see Enabling GitHub Advanced Security products for your enterprise.
Note
- At the enterprise level, only the creator of a custom pattern can edit the pattern, and use it in a dry run.
- You can only perform a dry run on repositories that you have administration access to. If an enterprise owner wants access to perform dry runs on any repository in an organization, they must be assigned the organization owner role. For more information, see Managing your role in an organization owned by your enterprise.
-
In the top-right corner of GitHub Enterprise Server, click your profile picture, then click Enterprise settings.
-
At the top of the page, click Policies.
-
Under "Policies", click Advanced Security Code security.
-
Under "Advanced Security Code security", click Security features.
-
Under "Secret scanning custom patterns", click New pattern.
-
Enter the details for your new custom pattern. You must at least provide the name for your pattern, and a regular expression for the format of your secret pattern.
- In the "Pattern name" field, type a name for your pattern.
- In the "Secret format" field, type a regular expression for the format of your secret pattern.
- You can click More options to provide other surrounding content or additional match requirements for the secret format. See Custom patterns reference.
- Provide a sample test string to make sure your configuration is matching the patterns you expect.
-
When you're ready to test your new custom pattern, to identify matches in the enterprise without creating alerts, click Save and dry run.
-
Search for and select up to 10 repositories where you want to perform the dry run.
-
When you're ready to test your new custom pattern, click Run.
-
When the dry run finishes, you'll see a sample of results (up to 1000). Review the results and identify any false positive results.
-
Edit the new custom pattern to fix any problems with the results, then, to test your changes, click Save and dry run.
-
When you're satisfied with your new custom pattern, click Publish pattern.
-
Optionally, to enable push protection for your custom pattern, click Enable. For more information, see Push protection.
Note
- To enable push protection for custom patterns, secret scanning as push protection needs to be enabled at the enterprise level.
- Enabling push protection for commonly found custom patterns can be disruptive to contributors.
After your pattern is created, secret scanning scans for any secrets in repositories within your organizations with GitHub Secret Protection enabled, including their entire Git history on all branches. Organization owners and repository administrators will be alerted to any secrets found, and can review the alert in the repository where the secret is found. For more information on viewing secret scanning alerts, see Manage secret scanning alerts.