이 버전의 GitHub Enterprise Server는 다음 날짜에 중단됩니다. 2025-08-27. 중요한 보안 문제에 대해서도 패치 릴리스가 이루어지지 않습니다. 더 뛰어난 성능, 향상된 보안, 새로운 기능을 위해 최신 버전의 GitHub Enterprise Server로 업그레이드합니다. 업그레이드에 대한 도움말은 GitHub Enterprise 지원에 문의하세요.

Configuring notifications

Choose the type of activity on GitHub that you want to receive notifications for and how you want these updates delivered.

Notification delivery options

You can receive notifications for activity on GitHub in the following locations.

  • The notifications inbox in the GitHub web interface
  • The notifications inbox on GitHub Mobile, which syncs with the inbox in the web interface
  • An email client that uses a verified email address, which can also sync with the notifications inbox in the web interface and GitHub Mobile

GitHub 및 GitHub Mobile에서 알림 받은 편지함을 사용하려면 알림 설정에서 EmailOn GitHub 둘 다의 알림을 사용하도록 설정해야 합니다. For more information, see Choosing your notification settings.

메일과 GitHub를 통해 알림을 받는 경우 알림의 읽음 또는 읽지 않음 상태를 자동으로 동기화하여 해당 메일 알림을 읽은 후 GitHub의 알림이 자동으로 읽음으로 표시되도록 할 수 있습니다. 이 동기화를 활성화하려면, 메일 클라이언트가 사이트 관리자가 구성한 GitHub Enterprise Server 인스턴스의 no-reply 메일 주소에서 이미지를 볼 수 있어야 합니다.

Benefits of the notifications inbox

The notifications inbox includes triaging options designed specifically for your GitHub notifications flow, including options to:

  • Triage multiple notifications at once.
  • Mark completed notifications as Done and remove them from your inbox. To view all of your notifications marked as Done, use the is:done query.
  • Save a notification to review later. Saved notifications are flagged in your inbox and kept indefinitely. To view all of your saved notifications, use the is:saved query.
  • Unsubscribe and remove a notification from your inbox.
  • Preview the issue or pull request where the notification originates on GitHub from within the notifications inbox.
  • See one of the latest reasons you're receiving a notification from your inbox with a reasons label.
  • Create custom filters to focus on different notifications when you want.
  • Group notifications in your inbox by repository or date to get a quick overview with less context switching.

In addition, you can receive and triage notifications on your mobile device with GitHub Mobile. For more information, see Managing your notification settings with GitHub Mobile or GitHub 모바일.

Benefits of using an email client for notifications

One benefit of using an email client is that all of your notifications can be kept indefinitely depending on your email client's storage capacity. Your inbox notifications are only kept for 5 months on GitHub unless you've marked them as Saved. Saved notifications are kept indefinitely. For more information about your inbox's retention policy, see About notifications.

Sending notifications to your email client also allows you to customize your inbox according to your email client's settings, which can include custom or color-coded labels.

Email notifications also allow flexibility with the types of notifications you receive and allow you to choose different email addresses for updates. For example, you can send certain notifications for a repository to a verified personal email address. For more information, about your email customization options, see Customizing your email notifications.

About participating and watching notifications

When you watch a repository, you're subscribing to updates for activity in that repository.

To see repositories that you're watching, go to your watching page. For more information, see Managing subscriptions for activity on GitHub.

You can configure notifications for a repository on the repository page, or on your watching page.

About custom notifications

You can customize notifications for a repository. For example, you can choose to only be notified when updates to one or more types of events (문제, 끌어오기 요청, 릴리스, 보안 경고 또는 토론) happen within a repository, or ignore all notifications for a repository. For more information, see Configuring your watch settings for an individual repository below.

Participating in conversations

Anytime you comment in a conversation or when someone @mentions your username, you are participating in a conversation. By default, you are automatically subscribed to a conversation when you participate in it. You can unsubscribe from a conversation you've participated in manually by clicking Unsubscribe on the issue or pull request or through the Unsubscribe option in the notifications inbox.

For conversations you're watching or participating in, you can choose whether you want to receive notifications by email or through the notifications inbox. For more information, see Choosing your notification settings.

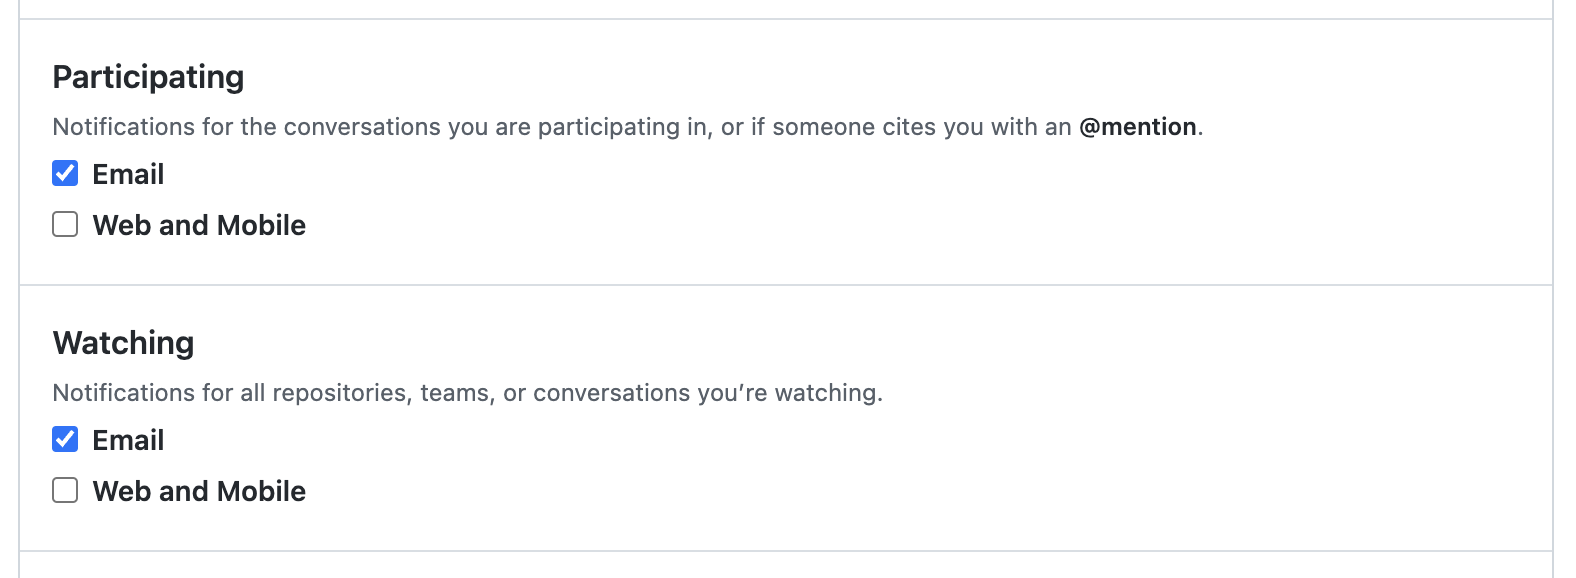
Screenshot of the "Notification settings" page. "Participating" and "Watching" each have two checkbox options: "Email" and "Web and Mobile".

For example, on your "Notification settings" page:

  • If you don't want notifications to be sent to your email, deselect email for participating and watching notifications.
  • If you want to receive notifications by email when you've participated in a conversation, then select email under "Participating".

If you do not enable watching or participating notifications for web and mobile, then your notifications inbox will not have any updates.

Customizing your email notifications

After enabling email notifications, GitHub will send notifications to you as multipart emails that contain both HTML and plain text copies of the content. Email notification content includes any Markdown, @mentions, emojis, hash-links, and more, that appear in the original content on GitHub. If you only want to see the text in the email, you can configure your email client to display the plain text copy only.

참고 항목

GitHub Enterprise Server 인스턴스에서 아웃바운드 메일 지원을 사용하도록 설정한 경우에만 메일 알림을 받게 됩니다. 자세한 내용은 사이트 관리자에게 문의하세요.

메일과 GitHub를 통해 알림을 받는 경우 알림의 읽음 또는 읽지 않음 상태를 자동으로 동기화하여 해당 메일 알림을 읽은 후 GitHub의 알림이 자동으로 읽음으로 표시되도록 할 수 있습니다. 이 동기화를 활성화하려면, 메일 클라이언트가 사이트 관리자가 구성한 GitHub Enterprise Server 인스턴스의 no-reply 메일 주소에서 이미지를 볼 수 있어야 합니다.

Choose a default email address where you want to send updates for conversations you're participating in or watching. You can also specify which activity on GitHub you want to receive updates for using your default email address. For example, choose whether you want updates sent to your default email from:

  • Comments on issues and pull requests
  • Pull request reviews
  • Pull request pushes
  • Your own updates, such as when you open, comment on, or close an issue or pull request

Depending on the organization that owns the repository, you can also send notifications to different email addresses. Your organization may require the email address to be verified for a specific domain. For more information, see Configuring notifications.

You can also send notifications for a specific repository to an email address. For more information, see 리포지토리로의 푸시에 대한 메일 알림 정보.

알림 설정에서 메일 알림을 수신하도록 선택한 경우에만 알림 메일을 받게 됩니다.

Filtering email notifications

Each email notification that GitHub sends contains header information. The header information in every email is consistent, so you can use it in your email client to filter or forward all GitHub notifications, or certain types of GitHub notifications.

If you believe you're receiving notifications that don't belong to you, examine the X-GitHub-Recipient and X-GitHub-Recipient-Address headers. These headers show who the intended recipient is. Depending on your email setup, you may receive notifications intended for another user.

Email notifications from GitHub contain header information.

HeaderInformation
From addressThis address will always be the no-reply email address configured by your site administrator.
To fieldThis field connects directly to the thread. If you reply to the email, you'll add a new comment to the conversation.
Cc addressGitHub will Cc you if you're subscribed to a conversation. The second Cc email address matches the notification reason. The suffix for these notification reasons is based on the no-reply email address configured by your site administrator. The possible notification reasons are:
  • assign: You were assigned to an issue or pull request.
  • author: You created an issue or pull request.
  • ci_activity: A GitHub Actions workflow run that you triggered was completed.
  • comment: You commented on an issue or pull request.
  • manual: There was an update to an issue or pull request you manually subscribed to.
  • mention: You were mentioned on an issue or pull request.
  • push: Someone committed to a pull request you're subscribed to.
  • review_requested: You or a team you're a member of was requested to review a pull request.
  • security_alert: GitHub detected a vulnerability in a repository you receive alerts for.
  • state_change: An issue or pull request you're subscribed to was either closed or opened.
  • subscribed: There was an update in a repository you're watching.
  • team_mention: A team you belong to was mentioned on an issue or pull request.
  • your_activity: You opened, commented on, or closed an issue or pull request.
List-Id fieldThis field identifies the name of the repository and its owner. The format of this address is always OWNER/REPOSITORY <REPOSITORY.OWNER>, e.g. List-Id: grain-lang/grain <grain.grain-lang.HOSTNAME>.
X-GitHub-Severity field하나 이상의 리포지토리에 영향을 주는 Dependabot alerts에 대한 메일 알림에는 X-GitHub-Severity 헤더 필드가 포함됩니다. X-GitHub-Severity 헤더 필드 값을 사용하여 Dependabot alerts에 대한 메일 알림을 필터링할 수 있습니다. The possible severity levels are:
  • low
  • moderate
  • high
  • critical
For more information, see Dependabot 경고 정보.

Replying to email notifications

You can reply to email notifications from GitHub and your reply will be posted to the issue, pull request, or discussion.

The reply-to address on each email notification identifies the thread and the account that the comment will be posted from. This email address remains valid until you reset your password.

GitHub will not always include the full email contents and will attempt to strip some personally identifiable information from comments created via an email reply:

  • Email addresses in a standard format, such as octocat@github.com, are transformed to ***@***.***.
  • Signatures and quoted reply chains, when the email client has used a > to mark those sections, are stripped.
  • While the unsubscribe link from your email notification is sometimes quoted, the link will only work when signed in to your account.
  • Email attachments are not included in the resulting comment.
  • The maximum length of a comment created via an email reply is 65530 characters.

Choosing your notification settings

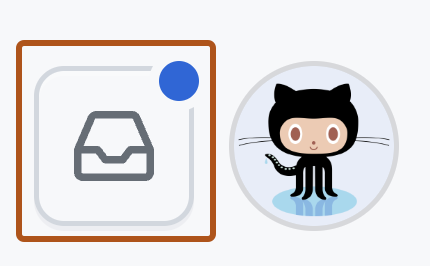
  1. 페이지의 오른쪽 위 모서리에서 을(를) 클릭합니다.

    GitHub 머리글의 오른쪽 모서리 스크린샷. 받은 편지함 아이콘에는 읽지 않은 알림이 있음을 나타내는 파란색 점이 있습니다.

  2. 왼쪽 사이드바의 리포지토리 목록에서 “알림 관리” 드롭다운을 사용하여 알림 설정을 클릭합니다.
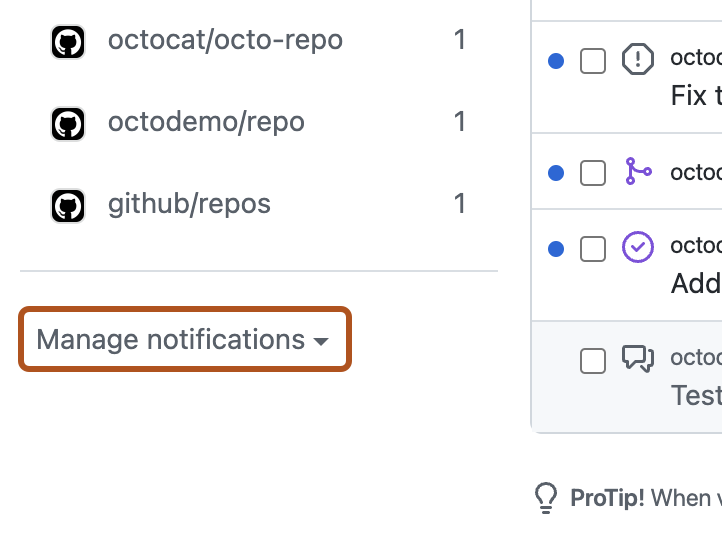
    “알림” 페이지 스크린샷. "알림 관리" 드롭다운 메뉴가 주황색 윤곽선으로 강조 표시됩니다.

  3. On the notifications settings page, choose how you receive notifications when:

Automatic watching

By default, anytime you gain access to a new repository, you will automatically begin watching that repository. Anytime you join a new team, you will automatically be subscribed to updates and receive notifications when that team is @mentioned. If you don't want to automatically be subscribed, you can unselect the automatic watching options in your notification settings.

Screenshot of "Automatic watching" options for teams and repositories.

If "Automatically watch repositories" is disabled, then you will not automatically watch your own repositories. You must navigate to your repository page and choose the watch option.

For more information, see Configuring notifications.

Configuring your watch settings for an individual repository

You can choose whether to watch or unwatch an individual repository. You can also choose to only be notified of certain event types such as 문제, 끌어오기 요청, 릴리스, 보안 경고 또는 토론 (if enabled for the repository), or completely ignore an individual repository.

  1. GitHub에서 리포지토리의 기본 페이지로 이동합니다.

  2. In the upper-right corner, select the "Watch" drop-down menu, then click a watch option.

    If you want to further customize notifications, click Custom, then select specific events that you want to be notified of, such as Issues or Pull Requests, in addition to participating and @mentions.

    For example, if you select "Issues", you will be notified about, and subscribed to, updates on every issue (including those that existed prior to you selecting this option) in the repository. If you're @mentioned in a pull request in this repository, you'll receive notifications for that too, and you'll be subscribed to updates on that specific pull request, in addition to being notified about issues.

Choosing where your organization’s email notifications are sent

If you belong to an organization, you can choose the email account you want notifications for organization activity sent to. For example, if you belong to an organization for work, you may want your notifications sent to your work email address, rather than your personal address.

알림 설정에서 메일 알림을 수신하도록 선택한 경우에만 알림 메일을 받게 됩니다.

  1. 페이지의 오른쪽 위 모서리에서 을(를) 클릭합니다.

    GitHub 머리글의 오른쪽 모서리 스크린샷. 받은 편지함 아이콘에는 읽지 않은 알림이 있음을 나타내는 파란색 점이 있습니다.

  2. 왼쪽 사이드바의 리포지토리 목록에서 “알림 관리” 드롭다운을 사용하여 알림 설정을 클릭합니다.

    “알림” 페이지 스크린샷. "알림 관리" 드롭다운 메뉴가 주황색 윤곽선으로 강조 표시됩니다.

  3. Under "Default notifications email", select the email address you'd like notifications sent to.

  4. Click Save.

Customizing email routes per organization

If you are a member of more than one organization, you can configure each one to send notifications to any of the email addresses for your account.

  1. 페이지의 오른쪽 위 모서리에서 을(를) 클릭합니다.

    GitHub 머리글의 오른쪽 모서리 스크린샷. 받은 편지함 아이콘에는 읽지 않은 알림이 있음을 나타내는 파란색 점이 있습니다.

  2. 왼쪽 사이드바의 리포지토리 목록에서 “알림 관리” 드롭다운을 사용하여 알림 설정을 클릭합니다.

    “알림” 페이지 스크린샷. "알림 관리" 드롭다운 메뉴가 주황색 윤곽선으로 강조 표시됩니다.

  3. Under "Custom routing," find your organization's name in the list.

  4. Click Edit next to the email address you want to change.

  5. Select one of your verified email addresses, then click Save.

Dependabot alerts notification options

The notification options for your user account are available at https://github.com/settings/notifications. You can configure notification settings for each repository, in the repository watch settings.

리포지토리에서 Dependabot alerts 알림을 받으려면 해당 리포지토리를 조사하고 "모든 활동" 알림을 받도록 구독하거나 "보안 경고"를 포함하도록 사용자 지정 설정을 구성해야 합니다. 자세한 내용은 Configuring notifications을(를) 참조하세요. 알림에 대한 배달 방법 및 알림이 전송되는 빈도를 선택할 수 있습니다. 기본적으로 엔터프라이즈 소유자가 인스턴스에 대한 알림을 받기 위해 메일을 구성한 경우 다음과 같이 Dependabot alerts를 받게 됩니다.

  • 받은 편지함에서 - 웹 알림으로 제공됩니다. 웹 알림은 리포지토리에 대해 Dependabot을 사용하도록 설정하고, 새 매니페스트 파일이 리포지토리에 커밋되고, 심각도가 위험 및 높음인 새로운 취약성이 발견되면 전송됩니다 (GitHub 옵션에서).
  • 이메일을 통해서. 리포지토리에 대해 Dependabot이(가) 사용 설정되면 새 매니페스트 파일이 리포지토리로 커밋된 경우 및 심각도가 위험 및 높음인 새로운 취약성이 발견된 경우 이메일이 전송됩니다(이메일 옵션).
  • 명령줄에서. 취약한 종속성이 있는 리포지토리에 푸시할 때 경고가 콜백으로 표시됩니다(CLI 옵션).
  • GitHub Mobile에서 웹 알림으로. 자세한 내용은 Configuring notifications을(를) 참조하세요.

참고 항목

메일 및 웹/GitHub Mobile 알림은 다음 기준별로 전송됩니다.

  • 리포지토리별. 리포지토리에 대해 Dependabot을 사용하도록 설정한 경우 또는 새 매니페스트 파일이 리포지토리로 커밋된 경우.
  • 조직별. 새 취약성이 발견된 경우.
  • 새 취약성이 발견된 경우 보냄. GitHub은(는) 취약성이 업데이트되면 알림을 보내지 않습니다.

Dependabot alerts에 대한 알림 방법을 사용자 지정할 수 있습니다. 예를 들어 취약성 요약 이메일주간 보안 이메일 요약 옵션을 사용하여 최대 10개의 리포지토리에 대한 알림을 요약하는 주간 요약 메일을 받을 수 있습니다.

For more information about the notification delivery methods available to you, and advice on optimizing your notifications for Dependabot alerts, see Dependabot 알림에 대한 경고 구성.

Secret scanning notification options

새 비밀이 검색되면 GitHub는 알림 기본 설정에 따라 리포지토리에 대한 보안 경고에 액세스할 수 있는 모든 사용자에게 알릴 수 있습니다. 사용자는 다음과 같습니다.

  • 리포지토리 관리자
  • 보안 관리자
  • 읽기/쓰기 권한이 있는 사용자 지정 역할의 사용자
  • 비밀이 유출된 리포지토리의 관리자인 경우 조직 소유자 및 엔터프라이즈 소유자

참고 항목

실수로 비밀을 커밋한 커밋 작성자는 알림 기본 설정에 관계없이 알림을 받게 됩니다.

다음의 경우 이메일 알림을 받습니다.

  • 리포지토리를 보고 있습니다.
  • 리포지토리의 "모든 작업" 또는 사용자 지정 "보안 경고"에 대한 경고를 사용하도록 설정했습니다.
  • 알림 설정에 있는 "구독"의 "시청 중"에서 이메일로 알림을 받도록 선택했습니다.

For more information on how to configure notifications for 비밀 검사 경고, see 비밀 검사에서 경고 모니터링.

GitHub Actions notification options

For repositories that are set up with GitHub Actions and that you are watching, you can choose how you want to receive workflow run updates.

On the "Notification settings" page, select "Email" or "Web" notifications. Optionally, to only receive notifications for failed workflow runs, select "Send notifications for failed workflows only".

Screenshot of the "Actions" section of "Notification settings" with checkboxes: "Email", "Web", and "Send notifications for failed workflows only."

Organization alerts notification options

If you're an organization owner, you'll receive email notifications by default when organization members add new deploy keys to repositories within the organization. You can unsubscribe from these notifications. On the notification settings page, under "Organization alerts", deselect Email.

Managing your notification settings with GitHub Mobile

When you install GitHub Mobile, you will automatically be opted into web notifications. Within the app, you can enable push notifications for the following events.

  • Direct mentions
  • Assignments to issues or pull requests
  • Requests to review a pull request
  • Requests to approve a deployment

You can also schedule when GitHub Mobile will send push notifications to your mobile device.

GitHub Enterprise Server는 백그라운드 페치를 사용하여 푸시 알림을 지원하므로 푸시 알림을 받는 데 지연이 발생할 수 있습니다.

Managing your notification settings with GitHub for iOS

  1. In the bottom menu, tap Profile.
  2. To view your settings, tap .
  3. To update your notification settings, tap Notifications and then use the toggles to enable or disable your preferred types of push notifications.
  4. Optionally, to schedule when GitHub Mobile will send push notifications to your mobile device, tap Working Hours, use the Custom working hours toggle, and then choose when you would like to receive push notifications.

Managing your notification settings with GitHub for Android

  1. In the bottom menu, tap Profile.
  2. To view your settings, tap .
  3. To update your notification settings, tap Configure Notifications and then use the toggles to enable or disable your preferred types of push notifications.
  4. Optionally, to schedule when GitHub Mobile will send push notifications to your mobile device, tap Working Hours, use the Custom working hours toggle, and then choose when you would like to receive push notifications.

Configuring your watch settings for an individual repository with GitHub Mobile

You can choose whether to watch or unwatch an individual repository. You can also choose to only be notified of new releases, or completely ignore an individual repository.

  1. On GitHub Mobile, navigate to the main page of the repository.
  2. Tap Watch.
  3. To choose what activities you receive notifications for, tap your preferred watch settings. For example, choose to only be notified when you are participating or @mentioned, or use the "Custom" option to select specific events that you want to be notified of.