Introduction
You can start Copilot cloud agent sessions from several places on GitHub. Once a session is running, you can monitor its progress, steer it with follow-up prompts, and iterate on the resulting pull request—all without leaving the browser.
For more information about Copilot cloud agent, see About GitHub Copilot cloud agent.
You can also start partner-built agents from these same entry points using agent apps. For more information, see Using agent apps.
Starting a session from the agents tab or panel
You can start sessions from the agents tab and the agents panel. The only difference is the entry point—once you see the "New agent task" form, the steps are the same.
-
Open the agents panel or tab:
- Open the Agents tab in a repository.
- Navigate to the agents page: Go to github.com/copilot/agents. You can also get here by opening the agents panel, then clicking View all.
- Open the agents panel: Click in the navigation bar at the top right of GitHub.
-
Using the dropdown menu in the prompt field, select the repository you want Copilot to work in.
-
Type a prompt describing your request. You can also add visual inputs like screenshots or UI mockups by pasting, dragging, or uploading an image. Files supported: image/png, image/jpeg, image/gif, image/webp.
For example,
Implement a user friendly message for common errors.If you want Copilot to open a pull request, you can ask in your prompt, for example
Open a pull request to implement a user friendly message for common errors. -
Optionally, select a base branch for Copilot's changes. Copilot will create a new branch based on this branch.
-
Optionally, you can click to open the agent dropdown menu, if you want to assign an agent or a custom agent with specialized behavior and tools. You can select an existing custom agent from your repository, organization, or enterprise. You can also click Create an agent to create a new agent profile in your selected repository and branch. For more information, see Creating custom agents for Copilot cloud agent.
Note
Third-party coding agents are available for all paid Copilot plans.
-
Optionally, you can use the dropdown menu to select the model that Copilot will use. For more information, see Changing the AI model for GitHub Copilot cloud agent.
-
Click or press Enter.
Copilot will start a new session, which will appear in the list below the prompt box. Copilot will work on the task and push any code changes.
You can track Copilot's work and open a pull request in one click from the session logs. For more information, see Managing agent sessions.
Starting a session from the dashboard
You can ask Copilot to start work from the prompt box in the dashboard. The dashboard is your personalized overview of your activity on GitHub, seen when you visit https://github.com while logged in.
-
Navigate to the dashboard at https://github.com.
-
Click the Task button.
-
Using the dropdown menu in the prompt field, select the repository you want Copilot to work in.
-
Type a prompt describing your request.
For example,
Implement a user friendly message for common errors.If you want Copilot to open a pull request, you can ask in your prompt, for example
Open a pull request to implement a user friendly message for common errors. -
Optionally, select a base branch for Copilot's pull request. Copilot will create a new branch based on this branch.
-
Optionally, you can click to open the agent dropdown menu, if you want to assign an agent or a custom agent with specialized behavior and tools. You can select an existing custom agent from your repository, organization, or enterprise. You can also click Create an agent to create a new agent profile in your selected repository and branch. For more information, see Creating custom agents for Copilot cloud agent.
Note
Third-party coding agents are available for all paid Copilot plans.
-
Click Send now or press Return.
You will be taken to the agents tab, and Copilot will start a new session, which will appear in the "Recent sessions" list below the prompt box. Copilot will work on the task and push any code changes.
Note
If you have enabled the New Dashboard Experience in feature preview, the new session will appear in "Agent sessions" under the prompt box in your dashboard. For more information, see Personal dashboard.
Starting from Copilot Chat
When you start a task from Copilot Chat, the new Copilot cloud agent session incorporates the context of your current chat conversation. This means you don't need to restate details you have already shared with Copilot in your /task prompt.
-
Open GitHub Copilot Chat on GitHub.com.
-
Type
/taskto ask Copilot to create a pull request, and give details of what you want Copilot to change.For example,
/task Create a pull request to put backticks around file names and variables in output. -
Optionally, select a base branch for Copilot's pull request. Copilot will create a new branch based on this branch, then push the changes to a pull request targeting that branch.
-
Optionally, you can click to open the agent dropdown menu, if you want to assign an agent or a custom agent with specialized behavior and tools. You can select an existing custom agent from your repository, organization, or enterprise. You can also click Create an agent to create a new agent profile in your selected repository and branch. For more information, see Creating custom agents for Copilot cloud agent.
Note
Third-party coding agents are available for all paid Copilot plans.
-
Click or press Enter.
Copilot will start a new session, which will appear in the list below the prompt box. Copilot will work on the task and push changes to its pull request, then add you as a reviewer when it has finished, triggering a notification.
Assigning an issue to Copilot
You can ask Copilot to start working on an issue by assigning the issue to Copilot. Copilot will start working on the task, raise a pull request, then request a review from you when it's finished.
Note
This feature is in public preview and subject to change.
-
On GitHub, navigate to the main page of the repository.
-
Under your repository name, click Issues.

-
Open the issue that you want to assign to Copilot.
-
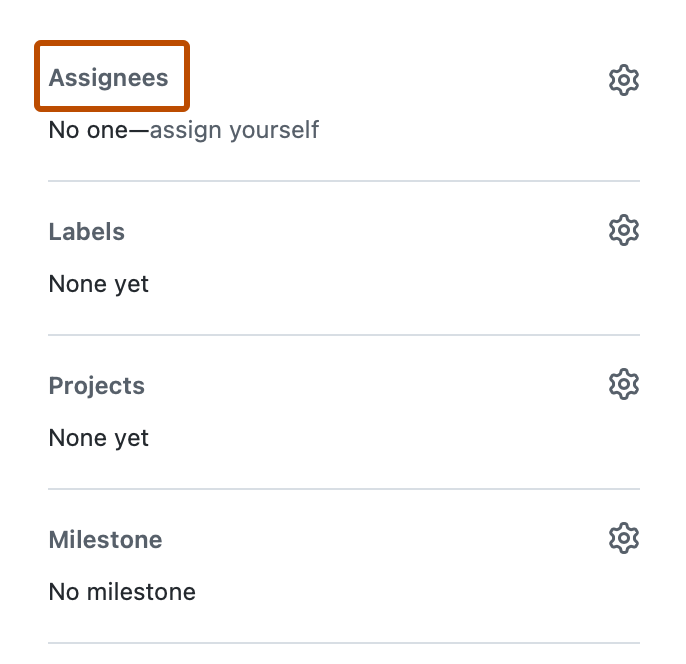
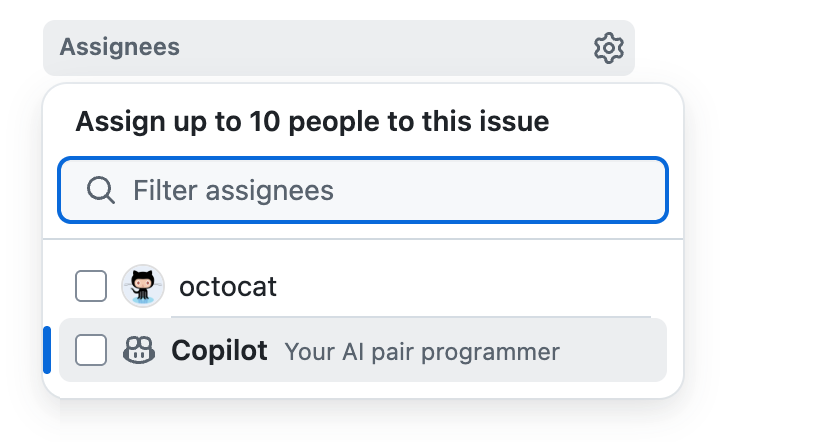
In the right side menu, click Assignees.
-
Click Copilot from assignees list.
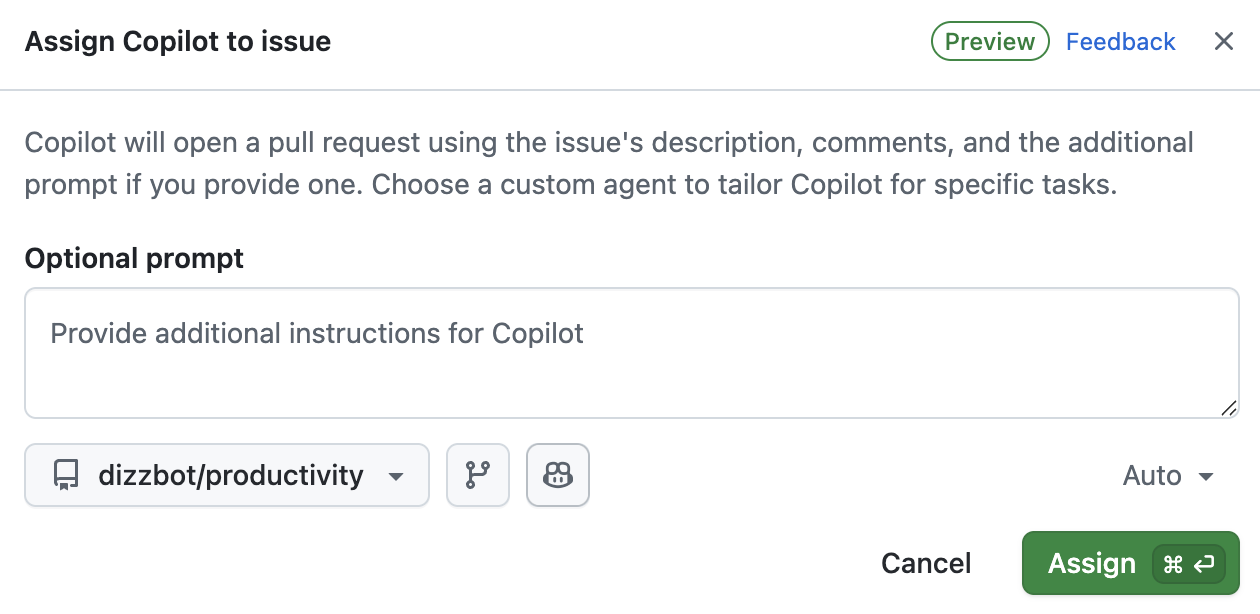
Additional options are displayed.
-
In the Optional prompt field you can add specific guidance for Copilot. Add any context, constraints, or specific requirements that will help Copilot to understand and complete the task.
For example, you might include instructions about specific coding patterns or frameworks to use, testing requirements, code style preferences, files or directories that should or shouldn't be modified.
In addition to the details you supply here, Copilot will use any custom instructions that have been configured for the target repository. See Adding repository custom instructions for GitHub Copilot.
-
You can use the dropdown menus in the dialog to change the repository that Copilot will work in and the branch that it will branch off from.
All repositories where you have at least read access will be displayed in the repository dropdown menu. However, you can only select a repository if you have write access to it, and if Copilot cloud agent is enabled for that repository.
If you select a repository in a different organization than the issue's source organization, or if you select a public repository when the issue is in a private repository, a warning will be displayed.
If you don't specify a repository, Copilot will work in the same repository as the issue. If you don't specify a branch, Copilot will work from the default branch of the selected repository.
Tip
When you assign an issue to Copilot, it gets sent the issue title, description, any comments that currently exist, and any additional instructions you provide. After assigning the issue, Copilot will not be aware of, and therefore won't react to, any further comments that are added to the issue. If you have more information, or changes to the original requirement, add this as a comment in the pull request that Copilot raises.
-
Optionally, you can click to open the agent dropdown menu, if you want to assign an agent or a custom agent with specialized behavior and tools. You can select an existing custom agent from your repository, organization, or enterprise. You can also click Create an agent to create a new agent profile in your selected repository and branch. For more information, see Creating custom agents for Copilot cloud agent.
Note
Third-party coding agents are available for all paid Copilot plans.
-
Optionally, you can use the dropdown menu to select the model that Copilot will use. For more information, see Changing the AI model for GitHub Copilot cloud agent.


You can also assign issues to Copilot from other places on GitHub.com:
- From the list of issues on a repository's Issues page.
- When viewing an issue in GitHub Projects.
Seeding a new repository
When creating a new repository, you can ask Copilot to seed the new repository by entering a prompt.
-
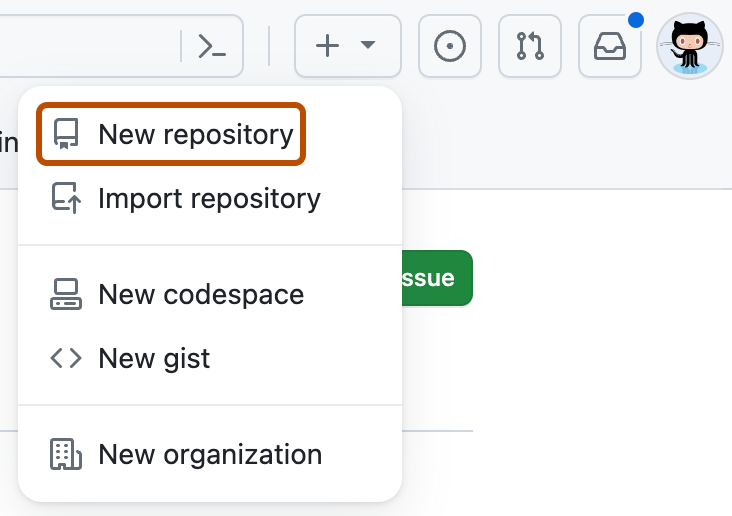
In the upper-right corner of any page, select , then click New repository.
-
Use the Owner dropdown menu to select the account you want to own the repository.

-
In the Prompt field, enter a prompt describing what you want Copilot to build.
For example,
Create a Rust CLI for converting CSV spreadsheets to Markdown -
Click Create repository.
Copilot will immediately open a draft pull request. Copilot will work on the task and push changes to its pull request, then add you as a reviewer when it has finished, triggering a notification.


Fixing a failing GitHub Actions workflow run
When an GitHub Actions workflow run fails on a pull request branch, you can ask Copilot to investigate and fix the failure.
-
On GitHub, navigate to the failing workflow run job page.
-
Click the Fix with Copilot button.
Copilot will start a new session, investigate the cause of the failure, and push a fix to your branch.
Continuing work on a pull request
You can mention @copilot in a comment on any pull request to ask Copilot to make changes. This works on pull requests created by Copilot and on pull requests you or others created.
By default, Copilot pushes commits directly to the pull request branch. To create a separate pull request instead, describe that in your comment. You can also check out the branch and push changes yourself.
Batch review comments instead of submitting them individually. When submitting a pull request comment (not a review or review comment) through the GitHub web interface, select a model with the model picker. Copilot uses the model from the original pull request by default.
Copilot only responds to comments from people who have write access to the repository.
When Copilot starts a new session in response to your comment, an eyes emoji (👀) reaction appears on the comment. A "Copilot has started work" event appears in the pull request timeline.

Copilot remembers context from previous sessions on the same pull request, so follow-up requests are faster and more reliable. If the pull request was created by a custom agent, mentioning @copilot continues using that same agent.
Resolving merge conflicts
You can ask Copilot to resolve merge conflicts on a pull request in two ways:
- Using the "Fix with Copilot" button: If a pull request has merge conflicts, click the Fix with Copilot button that appears in the merge box.
- Using an @copilot mention: Mention
@copilotin a comment on the pull request and ask it to fix the conflicts—for example, "@copilot resolve the merge conflicts on this PR."
Copilot analyzes the conflicting changes, resolves them, and verifies that the build, tests, and linter still pass. It then requests your review so you can confirm the resolution before merging.
Running Copilot cloud agent automatically with automations
You can set up automations to run Copilot cloud agent automatically, on a schedule or in response to events such as an issue being opened. You create and manage automations from the Automations pane in the Agents tab of a repository. For more information, see Creating automations with Copilot cloud agent.
Managing GitHub Actions workflow runs
By default, GitHub Actions workflows will not run automatically when Copilot pushes changes to a pull request.
GitHub Actions workflows can be privileged and have access to sensitive secrets. Inspect the proposed changes in the pull request and ensure that you are comfortable running your workflows on the pull request branch. You should be especially alert to any proposed changes in the .github/workflows/ directory that affect workflow files.
To allow GitHub Actions workflows to run, click the Approve and run workflows button in the pull request's merge box.

Optionally, you can configure Copilot cloud agent to allow GitHub Actions workflows to run without human intervention. For more information, see Configuring settings for GitHub Copilot cloud agent.
Giving feedback on Copilot's work
Use the feedback buttons on Copilot's pull requests and comments to rate the output. Your feedback helps improve Copilot's quality.
- On a pull request or comment from Copilot, click the thumbs up (👍) or thumbs down (👎) button.
- If you click the thumbs down button, optionally select a reason and leave a comment, then click Submit feedback.