Примечание.
For an overview of Copilot облачный агент, see О облачном агенте GitHub Copilot.
Introduction
You can start Copilot облачный агент from:
- GitHub Issues, by assigning an issue to Copilot
- The agents tab or panel on GitHub
- The dashboard on GitHub
- Копилот Чат in Visual Studio Code, JetBrains IDEs, Eclipse and Visual Studio 2026
- Копилот Чат on GitHub.com
- The GitHub CLI
- On GitHub Mobile
- Your preferred IDE or agentic coding tool with Model Context Protocol (MCP) support
- The Raycast launcher
- The "New repository" form on GitHub
- Jira
- Slack
- Microsoft Teams
- Azure Boards
- Linear
Copilot will start working on the task in the background. Some entry points open a pull request automatically. In other cases, you can prompt Copilot to open a pull request, or create a pull request when Copilot finishes work, from the session logs.
For more information, see О облачном агенте GitHub Copilot.
Assigning an issue to Copilot
You can ask Copilot to start working on an issue by assigning the issue to Copilot.
Copilot will start working on the task, raise a pull request, then request a review from you when it's finished working
You can assign an issue to Copilot:
- On GitHub.com (see the next section)
- On GitHub Mobile
- Via the GitHub API (see later in this article)
- Using the Raycast launcher
- Using GitHub CLI (see
gh issue edit)
Assigning an issue to Copilot on GitHub.com
Примечание.
This feature is in public preview and subject to change.
-
На GitHubперейдите на главную страницу репозитория.
-
В поле имени репозитория щелкните Issues.

-
Open the issue that you want to assign to Copilot.
-
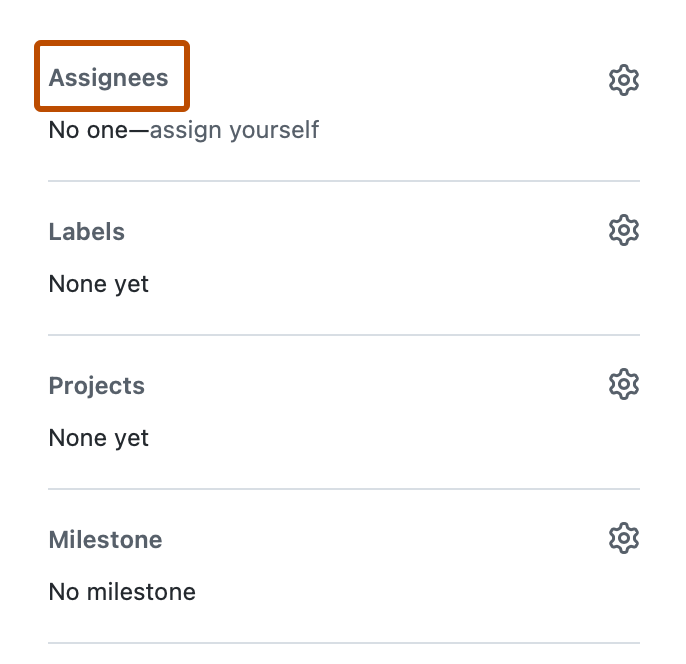
In the right side menu, click Assignees.
-
Click Copilot from assignees list.
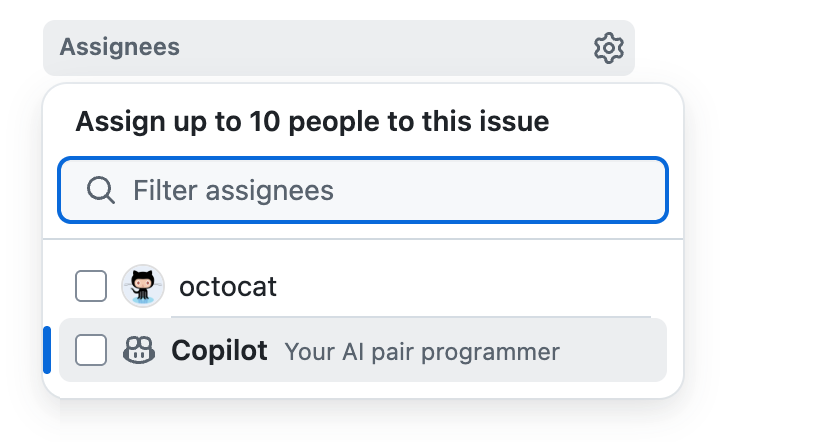
Additional options are displayed.
-
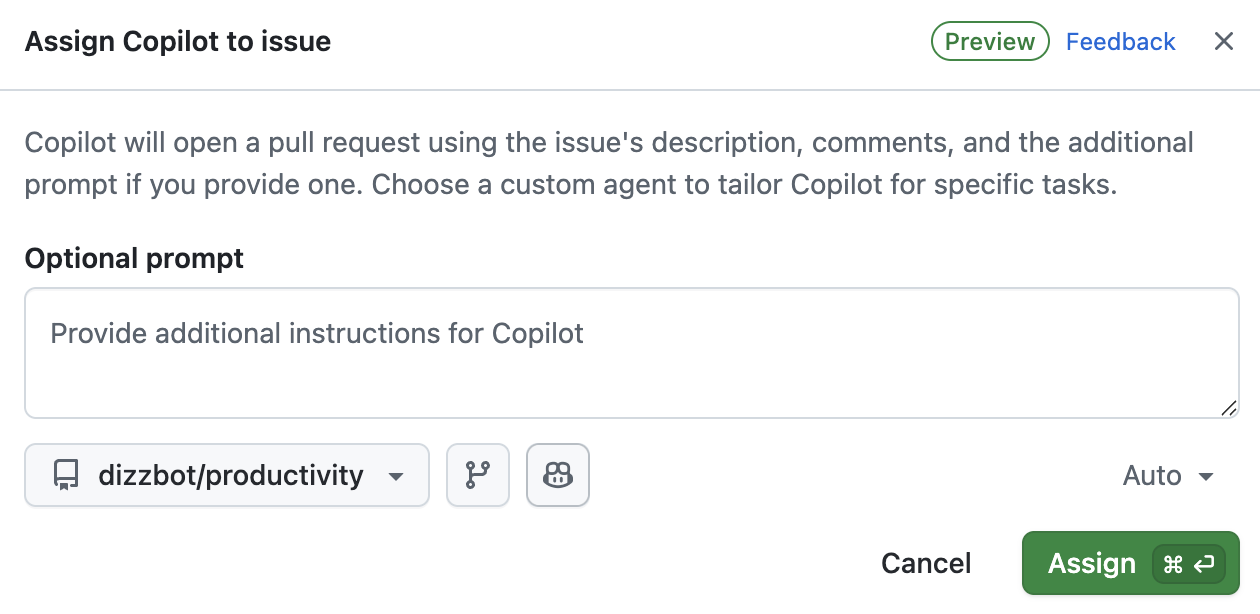
In the Optional prompt field you can add specific guidance for Copilot. Add any context, constraints, or specific requirements that will help Copilot to understand and complete the task.
For example, you might include instructions about specific coding patterns or frameworks to use, testing requirements, code style preferences, files or directories that should or shouldn't be modified.
In addition to the details you supply here, Copilot will use any custom instructions that have been configured for the target repository. See Добавление пользовательских инструкций репозитория для GitHub Copilot.
-
You can use the dropdown menus in the dialog to change the repository that Copilot will work in and the branch that it will branch off from.
All repositories where you have at least read access will be displayed in the repository dropdown menu. However, you can only select a repository if you have write access to it, and if Copilot облачный агент is enabled for that repository.
If you select a repository in a different organization than the issue's source organization, or if you select a public repository when the issue is in a private repository, a warning will be displayed.
If you don't specify a repository, Copilot will work in the same repository as the issue. If you don't specify a branch, Copilot will work from the default branch of the selected repository.
Совет
When you assign an issue to Copilot, it gets sent the issue title, description, any comments that currently exist, and any additional instructions you provide. After assigning the issue, Copilot will not be aware of, and therefore won't react to, any further comments that are added to the issue. If you have more information, or changes to the original requirement, add this as a comment in the pull request that Copilot raises.
-
По желанию, вы можете кликнуть , чтобы открыть выпадающее меню агента, если хотите назначить агента или Пользовательский агент агента со специализированным поведением и инструментами. Вы можете выбрать существующий Пользовательский агент из вашего репозитория, организации или предприятия. Вы также можете нажать «Создать агент», чтобы создать новый Профиль агента файл в выбранном репозитории и ветке. Дополнительные сведения см. в разделе Создание кастомных агентов для Copilot облачный агент.
Примечание.
Сторонние агенты по программированию доступны в GitHub Copilot Pro+ планах и Копилот Энтерпрайз доступны.
-
По желанию вы можете использовать выпадающее меню для выбора модели, которая Copilot будет использоваться. Дополнительные сведения см. в разделе Изменение модели ИИ для облачного агента GitHub Copilot.


You can also assign issues to Copilot from other places on GitHub.com:
- From the list of issues on a repository's Issues page.
- When viewing an issue in GitHub Проекты.
Assigning an issue to Copilot on GitHub Mobile
- In GitHub Mobile, navigate to the repository that contains the issue you want to assign to Copilot.
- Click Issues.
- Open the issue that you want to assign to Copilot.
- Tap the icon.
- Beside "Assignees", tap Edit.
- Beside "Copilot", click the plus sign.
- Click Done.
Assigning an issue to Copilot via the GitHub API
Примечание.
This feature is in public preview and subject to change.
You can assign issues to Copilot using either the GraphQL API or the REST API. Both APIs support an optional Agent Assignment input to customize the task:
| GraphQL parameter | REST parameter | Description |
|---|---|---|
targetRepositoryId | target_repo | The repository where Copilot will work |
baseRef | base_branch | The branch that Copilot will branch from |
customInstructions | custom_instructions | Additional instructions for Copilot |
customAgent | custom_agent | A Пользовательский агент to use for the task |
model | model | The model for Copilot to use |
Using the GraphQL API
Примечание.
You must include the GraphQL-Features header with the values issues_copilot_assignment_api_support and coding_agent_model_selection.
You can use the following GraphQL mutations to assign issues to Copilot:
Creating and assigning a new issue
-
Make sure you're authenticating with the API using a user token, for example a personal access token or a GitHub App user-to-server token.
Примечание.
If using a fine-grained personal access token, it needs the following permissions to assign Copilot to an issue:
- Read access to metadata
- Read and write access to actions, contents, issues and pull requests
If using a personal access token (classic), it needs the
reposcope to assign Copilot to an issue. -
Verify that Copilot облачный агент is enabled in the repository by checking if the repository's
suggestedActorsin the GraphQL API includes Copilot. Replaceocto-orgwith the repository owner, andocto-repowith the repository name.GraphQL query { repository(owner: "octo-org", name: "octo-repo") { suggestedActors(capabilities: [CAN_BE_ASSIGNED], first: 100) { nodes { login __typename ... on Bot { id } ... on User { id } } } } }query { repository(owner: "octo-org", name: "octo-repo") { suggestedActors(capabilities: [CAN_BE_ASSIGNED], first: 100) { nodes { login __typename ... on Bot { id } ... on User { id } } } } }If Copilot облачный агент is enabled for the user and in the repository, the first node returned from the query will have the
loginvaluecopilot-swe-agent. -
Make a note of the
idvalue of this login. -
Fetch the GraphQL global ID of the repository you want to create the issue in, replacing
octo-orgwith the repository owner, andocto-repowith the repository name.GraphQL query { repository(owner: "octo-org", name: "octo-repo") { id } }query { repository(owner: "octo-org", name: "octo-repo") { id } } -
Create the issue with the
createIssuemutation. ReplaceREPOSITORY_IDwith the ID returned from the previous step, andBOT_IDwith the ID returned from the step before that. You can optionally include theagentAssignmentinput to customize the task.Shell gh api graphql -f query='mutation { createIssue(input: { repositoryId: "REPOSITORY_ID", title: "Implement comprehensive unit tests", body: "DETAILS", assigneeIds: ["BOT_ID"], agentAssignment: { targetRepositoryId: "REPOSITORY_ID", baseRef: "main", customInstructions: "Add comprehensive test coverage", customAgent: "", model: "" } }) { issue { id title assignees(first: 10) { nodes { login } } } } }' -H 'GraphQL-Features: issues_copilot_assignment_api_support,coding_agent_model_selection'gh api graphql -f query='mutation { createIssue(input: { repositoryId: "REPOSITORY_ID", title: "Implement comprehensive unit tests", body: "DETAILS", assigneeIds: ["BOT_ID"], agentAssignment: { targetRepositoryId: "REPOSITORY_ID", baseRef: "main", customInstructions: "Add comprehensive test coverage", customAgent: "", model: "" } }) { issue { id title assignees(first: 10) { nodes { login } } } } }' -H 'GraphQL-Features: issues_copilot_assignment_api_support,coding_agent_model_selection'
Assigning an existing issue
-
Make sure you're authenticating with the API using a user token, for example a personal access token or a GitHub App user-to-server token.
-
Verify that Copilot облачный агент is enabled in the repository by checking if the repository's
suggestedActorsin the GraphQL API includes Copilot. Replaceocto-orgwith the repository owner, andocto-repowith the repository name.GraphQL query { repository(owner: "monalisa", name: "octocat") { suggestedActors(capabilities: [CAN_BE_ASSIGNED], first: 100) { nodes { login __typename ... on Bot { id } ... on User { id } } } } }query { repository(owner: "monalisa", name: "octocat") { suggestedActors(capabilities: [CAN_BE_ASSIGNED], first: 100) { nodes { login __typename ... on Bot { id } ... on User { id } } } } }If Copilot облачный агент is enabled for the user and in the repository, the first node returned from the query will have the
loginvaluecopilot-swe-agent. -
Fetch the GraphQL global ID of the issue you want to assign to Copilot, replacing
monalisawith the repository owner,octocatwith the name and9000with the issue number.GraphQL query { repository(owner: "monalisa", name: "octocat") { issue(number: 9000) { id title } } }query { repository(owner: "monalisa", name: "octocat") { issue(number: 9000) { id title } } } -
Assign the existing issue to Copilot using the
replaceActorsForAssignablemutation. ReplaceISSUE_IDwith the ID returned from the previous step,BOT_IDwith the ID returned from the step before that, andREPOSITORY_IDwith the repository ID. You can optionally include theagentAssignmentinput to customize the task.Shell gh api graphql -f query='mutation { replaceActorsForAssignable(input: { assignableId: "ISSUE_ID", actorIds: ["BOT_ID"], agentAssignment: { targetRepositoryId: "REPOSITORY_ID", baseRef: "main", customInstructions: "Fix the reported bug", customAgent: "", model: "" } }) { assignable { ... on Issue { id title assignees(first: 10) { nodes { login } } } } } }' -H 'GraphQL-Features: issues_copilot_assignment_api_support,coding_agent_model_selection'gh api graphql -f query='mutation { replaceActorsForAssignable(input: { assignableId: "ISSUE_ID", actorIds: ["BOT_ID"], agentAssignment: { targetRepositoryId: "REPOSITORY_ID", baseRef: "main", customInstructions: "Fix the reported bug", customAgent: "", model: "" } }) { assignable { ... on Issue { id title assignees(first: 10) { nodes { login } } } } } }' -H 'GraphQL-Features: issues_copilot_assignment_api_support,coding_agent_model_selection' -
Alternatively, you can use the
updateIssuemutation to update an existing issue and assign it to Copilot. ReplaceISSUE_IDwith the issue ID andBOT_IDwith the bot ID.Shell gh api graphql -f query='mutation { updateIssue(input: { id: "ISSUE_ID", assigneeIds: ["BOT_ID"], agentAssignment: { targetRepositoryId: "REPOSITORY_ID", baseRef: "main", customInstructions: "Update feature implementation", customAgent: "", model: "" } }) { issue { id title assignees(first: 10) { nodes { login } } } } }' -H 'GraphQL-Features: issues_copilot_assignment_api_support,coding_agent_model_selection'gh api graphql -f query='mutation { updateIssue(input: { id: "ISSUE_ID", assigneeIds: ["BOT_ID"], agentAssignment: { targetRepositoryId: "REPOSITORY_ID", baseRef: "main", customInstructions: "Update feature implementation", customAgent: "", model: "" } }) { issue { id title assignees(first: 10) { nodes { login } } } } }' -H 'GraphQL-Features: issues_copilot_assignment_api_support,coding_agent_model_selection' -
You can also use the
addAssigneesToAssignablemutation to add Copilot to an existing issue while keeping other assignees. ReplaceISSUE_IDwith the issue ID andBOT_IDwith the bot ID.Shell gh api graphql -f query='mutation { addAssigneesToAssignable(input: { assignableId: "ISSUE_ID", assigneeIds: ["BOT_ID"], agentAssignment: { targetRepositoryId: "REPOSITORY_ID", baseRef: "main", customInstructions: "Collaborate on this task", customAgent: "", model: "" } }) { assignable { ... on Issue { id title assignees(first: 10) { nodes { login } } } } } }' -H 'GraphQL-Features: issues_copilot_assignment_api_support,coding_agent_model_selection'gh api graphql -f query='mutation { addAssigneesToAssignable(input: { assignableId: "ISSUE_ID", assigneeIds: ["BOT_ID"], agentAssignment: { targetRepositoryId: "REPOSITORY_ID", baseRef: "main", customInstructions: "Collaborate on this task", customAgent: "", model: "" } }) { assignable { ... on Issue { id title assignees(first: 10) { nodes { login } } } } } }' -H 'GraphQL-Features: issues_copilot_assignment_api_support,coding_agent_model_selection'
Using the REST API
You can use the following REST API endpoints to assign issues to Copilot:
Adding assignees to an existing issue
gh api \
  --method POST \
  -H "Accept: application/vnd.github+json" \
  -H "X-GitHub-Api-Version: 2022-11-28" \
  /repos/OWNER/REPO/issues/ISSUE_NUMBER/assignees \
  --input - <<< '{
  "assignees": ["copilot-swe-agent[bot]"],
  "agent_assignment": {
    "target_repo": "OWNER/REPO",
    "base_branch": "main",
    "custom_instructions": "",
    "custom_agent": "",
    "model": ""
  }
}'
Creating a new issue
gh api \
  --method POST \
  -H "Accept: application/vnd.github+json" \
  -H "X-GitHub-Api-Version: 2022-11-28" \
  /repos/OWNER/REPO/issues \
  --input - <<< '{
  "title": "Issue title",
  "body": "Issue description.",
  "assignees": ["copilot-swe-agent[bot]"],
  "agent_assignment": {
    "target_repo": "OWNER/REPO",
    "base_branch": "main",
    "custom_instructions": "",
    "custom_agent": "",
    "model": ""
  }
}'
Updating an existing issue
gh api \
  --method PATCH \
  -H "Accept: application/vnd.github+json" \
  -H "X-GitHub-Api-Version: 2022-11-28" \
  /repos/OWNER/REPO/issues/ISSUE_NUMBER \
  --input - <<< '{
  "assignees": ["copilot-swe-agent[bot]"],
  "agent_assignment": {
    "target_repo": "OWNER/REPO",
    "base_branch": "main",
    "custom_instructions": "",
    "custom_agent": "",
    "model": ""
  }
}'
Assigning an issue to Copilot from Raycast
Raycast — это расширяемый лаунчер для Windows и macOS. С GitHub Copilot расширением для Raycast вы можете запускать и отслеживать Copilot облачный агент задачи, а также смотреть журналы сессий в реальном времени, где бы вы ни находились на компьютере.
-
Установите Raycast с веб-сайта Raycast.
-
Установите GitHub Copilot расширение для Raycast, нажав кнопку «Установить расширение » на странице расширения.
-
Open Raycast, search for "Copilot," find the Assign Issues to Copilot command, then press Enter.
-
Click Sign in with GitHub, then complete the authentication flow. Raycast will re-open.
-
Select the repository you want Copilot to work in.
-
Select the issue you want to assign to Copilot.
-
Optionally, select a base branch for Copilot's pull request. Copilot will create a new branch based on this branch, then push the changes to a pull request targeting that branch.
-
По желанию выберите Пользовательский агент Со специальным поведением и инструментами в выпадающем меню. Дополнительные сведения см. в разделе Создание кастомных агентов для Copilot облачный агент.
-
По желанию вы можете использовать выпадающее меню для выбора модели, которая Copilot будет использоваться. Дополнительные сведения см. в разделе Изменение модели ИИ для облачного агента GitHub Copilot.
-
Optionally, provide additional instructions. These will be passed to Copilot alongside your issue contents.
-
Press Command+Enter (macOS) or Ctrl+Enter (Windows) to assign the issue.
Copilot will start a new session. Copilot will work on the task and push changes to its pull request, then add you as a reviewer when it has finished, triggering a notification.
Примечание.
Если вы не можете выбрать конкретный репозиторий при запуске задачи, организация, владеющая репозиторием, возможно, включила OAuth app ограничения доступа. Чтобы узнать, как запросить одобрение для «GitHub Copilot для Raycast OAuth app», см. Запрос утверждения организации для приложений OAuth.
Asking Copilot to start work from the agents tab or panel
You can ask start sessions from the agents tab and the agents panel. The only difference is the entry point - once you see the "New agent task" form, the steps are the same.
-
Откройте панель или вкладку агентов:
- Откройте вкладку в репозитории.
- Перейдите на страницу агентов: перейдите к github.com/copilot/agents. Вы также можете получить здесь, открыв панель агентов, а затем щелкнув "Просмотреть все".
- Откройте панель агентов: щелкните в панели навигации в правом верхнем углу GitHub.
-
Используя выпадающее меню в поле запросов, выберите репозиторий, в котором хотите Copilot работать.
-
Введите запрос, описывающий запрос. Вы также можете добавить визуальные вводы, такие как скриншоты или макеты интерфейса, вставляя, перетаскивая или загружая изображение. Поддерживаемые файлы: image/png, image/jpeg, image/gif, image/webp.
Например:
Create a pull request to implement a user friendly message for common errors. -
По желанию выберите базовую ветку для Copilotpull request. Copilot создаёт новую ветку на основе этой ветки, а затем отправляет изменения в pull-запрос, ориентированный на эту ветку.
-
По желанию, вы можете кликнуть , чтобы открыть выпадающее меню агента, если хотите назначить агента или Пользовательский агент агента со специализированным поведением и инструментами. Вы можете выбрать существующий Пользовательский агент из вашего репозитория, организации или предприятия. Вы также можете нажать «Создать агент», чтобы создать новый Профиль агента файл в выбранном репозитории и ветке. Дополнительные сведения см. в разделе Создание кастомных агентов для Copilot облачный агент.
Примечание.
Сторонние агенты по программированию доступны в GitHub Copilot Pro+ планах и Копилот Энтерпрайз доступны.
-
По желанию вы можете использовать выпадающее меню для выбора модели, которая Copilot будет использоваться. Дополнительные сведения см. в разделе Изменение модели ИИ для облачного агента GitHub Copilot.
-
Нажмите или нажмите Enter.
       Copilot начнёт новую сессию, которая появится в списке под окном с подсказками.
       Copilot Будет работать над задачей и внести изменения в её pull-запрос, а после завершения добавлю вас в качестве рецензента, что вызовет уведомление.
Asking Copilot to start work from the dashboard
You can ask Copilot to open a pull request from the Copilot prompt box in the dashboard. The dashboard is your personalized overview of your activity on GitHub, seen when you visit https://github.com while logged in.
-
Navigate to the dashboard at https://github.com.
-
Click the Task button.
-
Using the dropdown menu in the prompt field, select the repository you want Copilot to work in.
-
Type a prompt describing your request.
For example,
Implement a user friendly message for common errors.If you want Copilot to open a pull request, you can ask in your prompt, for example
Open a pull request to implement a user friendly message for common errors. -
Optionally, select a base branch for Copilot's pull request. Copilot will create a new branch based on this branch.
-
По желанию, вы можете кликнуть , чтобы открыть выпадающее меню агента, если хотите назначить агента или Пользовательский агент агента со специализированным поведением и инструментами. Вы можете выбрать существующий Пользовательский агент из вашего репозитория, организации или предприятия. Вы также можете нажать «Создать агент», чтобы создать новый Профиль агента файл в выбранном репозитории и ветке. Дополнительные сведения см. в разделе Создание кастомных агентов для Copilot облачный агент.
Примечание.
Сторонние агенты по программированию доступны в GitHub Copilot Pro+ планах и Копилот Энтерпрайз доступны.
-
Click Send now or press Return.
You will be taken to the agents tab, and Copilot will start a new session, which will appear in the "Recent sessions" list below the prompt box. Copilot will work on the task and push any code changes.
Примечание.
If you have enabled the New Dashboard Experience in feature preview, the new session will appear in "Agent sessions" under the prompt box in your dashboard. For more information, see Личная панель мониторинга.
Asking Copilot to create a pull request from Копилот Чат in Visual Studio Code
-
Install the GitHub Pull Requests extension for Visual Studio Code.
-
Open Чат GitHub Copilot in Visual Studio Code.
-
Type a prompt explaining what you want Copilot to do.
For example,
Put backticks around file names and variables in outputСовет
To help Copilot, you can select the relevant line(s) of code before submitting your prompt.
-
Submit your prompt by clicking the Delegate this task to the GitHub Copilot cloud agent button, next to the Send button
-
If you have local changes, a dialog will be displayed asking if you want to push those changes so Copilot can start from your current state. Click Include changes to push your changes, or Ignore changes to ask Copilot to start its work from your repository's default branch.
Copilot will start a new session and respond with a link to the pull request it creates. It will work on the task and push changes to the pull request, and then add you as a reviewer when it has finished, triggering a notification.
Asking Copilot to create a pull request from Копилот Чат in JetBrains IDEs
Примечание.
Copilot облачный агент in JetBrains IDEs is in public preview, and subject to change.
-
Open Чат GitHub Copilot in your JetBrains IDE.
-
Type a prompt explaining what you want Copilot to do
For example,
Put backticks around file names and variables in output -
Click the Delegate to Cloud Agent button next to the Send button.
Copilot will start a new session and respond with a link to the pull request it creates. It will work on the task and push changes to the pull request, and then add you as a reviewer when it has finished, triggering a notification from GitHub and in the IDE.
Asking Copilot to create a pull request from Копилот Чат in Eclipse
Примечание.
Copilot облачный агент in Eclipse is in public preview, and subject to change.
-
Open Чат GitHub Copilot in Eclipse.
-
Type a prompt explaining what you want Copilot to do.
For example,
Put backticks around file names and variables in output -
Click next to the Send button.
-
In the dialog box that opens, select the repository you want Copilot to work in, then click Continue.
Copilot will start a new session and respond with a link to the pull request it creates. It will work on the task and push changes to the pull request, and then add you as a reviewer when it has finished, triggering a notification from GitHub and in the IDE.
Asking Copilot to create a pull request from Копилот Чат in Visual Studio 2026
Примечание.
To use Copilot облачный агент in Visual Studio, you'll need to be running at least December Update 18.1.0 of Visual Studio 2026.
-
Enable Copilot облачный агент support in Visual Studio.
- Open the Tools menu, then click Options.
- In the sidebar, select GitHub.
- Check the Enable Copilot Cloud agent (preview) box.
- Restart Visual Studio.
-
Open Чат GitHub Copilot in Visual Studio.
-
Enter a prompt, giving details of what you want Copilot to change.
For example,
Put backticks around file names and variables in log output. -
Submit your prompt by clicking the Delegate this task to the GitHub Copilot cloud agent button, next to the Send button.
Copilot asks you to confirm that you want to use the cloud agent to create a pull request.
-
Click Confirm.
Copilot will start a new session and respond with a link to the pull request it creates. It will work on the task and push changes to the pull request, and then add you as a reviewer when it has finished, triggering a notification.
Asking Copilot to create a pull request from Копилот Чат in GitHub.com
-
Open Чат GitHub Copilot on GitHub.com.
-
Type
/taskto ask Copilot to create a pull request, and give details of what you want Copilot to change.For example,
/task Create a pull request to put backticks around file names and variables in output. -
Optionally, select a base branch for Copilot's pull request. Copilot will create a new branch based on this branch, then push the changes to a pull request targeting that branch.
-
По желанию, вы можете кликнуть , чтобы открыть выпадающее меню агента, если хотите назначить агента или Пользовательский агент агента со специализированным поведением и инструментами. Вы можете выбрать существующий Пользовательский агент из вашего репозитория, организации или предприятия. Вы также можете нажать «Создать агент», чтобы создать новый Профиль агента файл в выбранном репозитории и ветке. Дополнительные сведения см. в разделе Создание кастомных агентов для Copilot облачный агент.
Примечание.
Сторонние агенты по программированию доступны в GitHub Copilot Pro+ планах и Копилот Энтерпрайз доступны.
-
Click or press Enter.
Copilot will start a new session, which will appear in the list below the prompt box. Copilot will work on the task and push changes to its pull request, then add you as a reviewer when it has finished, triggering a notification.
Asking Copilot to start work from GitHub Mobile
-
In GitHub Mobile, tap the icon in the bottom right corner of the screen, then tap New Session.
-
Using the dropdown menu in the prompt field, select the repository you want Copilot to work in.
-
Enter a prompt describing your request.
For example:
Implement a user friendly message for common errors..If you want Copilot to open a pull request, you can ask in your prompt, for example
Open a pull request to implement a user friendly message for common errors. -
Optionally, select a base branch for Copilot's changes. Copilot will create a new branch based on this branch.
-
По желанию выберите Пользовательский агент Со специальным поведением и инструментами в выпадающем меню. Дополнительные сведения см. в разделе Создание кастомных агентов для Copilot облачный агент.
-
По желанию вы можете использовать выпадающее меню для выбора модели, которая Copilot будет использоваться. Дополнительные сведения см. в разделе Изменение модели ИИ для облачного агента GitHub Copilot.
-
Click the submit button.
Copilot will start a new session, work on the task and push any code changes.
You can track Copilot's work and open a pull request in one click from the session logs. For more information, see Отслеживание сессий GitHub Copilot.
Asking Copilot to create a pull request from the GitHub CLI
Примечание.
The agent-task command set is only available in v2.80.0 or later of the GitHub CLI. This command set is a public preview and is subject to change.
You can start a new Copilot облачный агент session with the gh agent-task create command in the GitHub CLI.
When you run the command without any arguments, you are asked to enter a prompt. Copilot облачный агент acts on the prompt and opens a pull request in the current repository.
You can use command line options to:
- Provide the prompt (
gh agent-task create "Example prompt") - Choose a base branch, instead of using the repository's default branch (
--base) - Select a repository, instead of targeting the current repository (
--repo) - Follow the session log in real time (
--follow)
To see all of the available options, run gh agent-task create --help.
Asking Copilot to create a pull request from the GitHub MCP server
Примечание.
- This capability is only available on the remote GitHub MCP server and host applications where remote MCP servers are supported.
-
Install the GitHub MCP server in your preferred IDE or agentic coding tool. See Использование GitHub MCP сервера в вашем IDE.
-
Ensure the
create_pull_request_with_copilottool is enabled. -
Open chat.
-
Type a prompt asking Copilot to create a pull request, with the details of what you want to change.
For example,
Open a PR in my repository to expand unit test coverage.Совет
- You can ask Copilot to open a pull request using a specific branch as the base branch by including it in your prompt.
-
Submit your prompt.
Copilot will start a new session, open a draft pull request and work on the task in the background. As it works, it will push changes to the pull request, and once it has finished, it will add you as a reviewer. In most cases, the MCP host will show you the URL of the created pull request.
Asking Copilot to create a pull request from Raycast
Raycast — это расширяемый лаунчер для Windows и macOS. С GitHub Copilot расширением для Raycast вы можете запускать и отслеживать Copilot облачный агент задачи, а также смотреть журналы сессий в реальном времени, где бы вы ни находились на компьютере.
-
Установите Raycast с веб-сайта Raycast.
-
Установите GitHub Copilot расширение для Raycast, нажав кнопку «Установить расширение » на странице расширения.
-
Open Raycast, search for "Copilot," find the Create Task command, then press Enter.
-
Click Sign in with GitHub, then complete the authentication flow. Raycast will re-open.
-
Type a prompt describing what you want Copilot to do.
For example,
Implement a user friendly message for common errors. -
Select the repository you want Copilot to work in.
-
Optionally, select a base branch for Copilot's pull request. Copilot will create a new branch based on this branch, then push the changes to a pull request targeting that branch.
-
По желанию выберите Пользовательский агент Со специальным поведением и инструментами в выпадающем меню. Дополнительные сведения см. в разделе Создание кастомных агентов для Copilot облачный агент.
-
По желанию вы можете использовать выпадающее меню для выбора модели, которая Copilot будет использоваться. Дополнительные сведения см. в разделе Изменение модели ИИ для облачного агента GitHub Copilot.
-
Press Command+Enter (macOS) or Ctrl+Enter (Windows) to start the task.
Copilot will start a new session. Copilot will work on the task and push changes to its pull request, then add you as a reviewer when it has finished, triggering a notification.
Примечание.
Если вы не можете выбрать конкретный репозиторий при запуске задачи, организация, владеющая репозиторием, возможно, включила OAuth app ограничения доступа. Чтобы узнать, как запросить одобрение для «GitHub Copilot для Raycast OAuth app», см. Запрос утверждения организации для приложений OAuth.
Asking Copilot to create a pull request from the "New repository" page
When creating a new repository, you can ask Copilot to seed the new repository by entering a prompt.
-
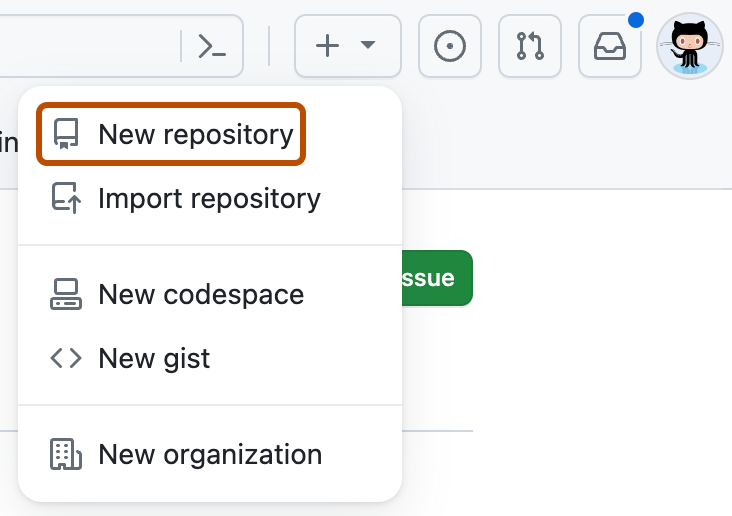
В правом верхнем углу любой страницы выберите , а затем нажмите кнопку "Создать репозиторий".
-
Используйте раскрывающееся меню "Владелец"**, **чтобы выбрать учетную запись, которую вы хотите владеть репозиторием.

-
In the Prompt field, enter a prompt describing what you want Copilot to build.
For example,
Create a Rust CLI for converting CSV spreadsheets to Markdown -
Щелкните Создать репозиторий.
Copilot will immediately open a draft pull request. Copilot will work on the task and push changes to its pull request, then add you as a reviewer when it has finished, triggering a notification.


Мониторинг хода выполнения
Вы можете посмотреть свои текущие и прошлые Copilot сессии на панели агентов, страницеVisual Studio Code агентов и других сайтах. См . раздел AUTOTITLE.