組織または個人アカウント用に、既定の issue テンプレートと issue テンプレート用の既定の構成ファイルを作成できます。 詳しくは、「既定のコミュニティ正常性ファイルの作成」をご覧ください。
Issue テンプレートを作成する
-
GitHub で、リポジトリのメイン ページに移動します。
-
リポジトリ名の下にある [設定] をクリックします。 [設定] タブが表示されない場合は、 [] ドロップダウン メニューを選び、 [設定] をクリックします。
![タブを示すリポジトリ ヘッダーのスクリーンショット。 [設定] タブが濃いオレンジ色の枠線で強調表示されています。](https://github.github.com/docs-ghes-3.10/assets/cb-28260/images/help/repository/repo-actions-settings.png)
-
[機能] セクションの [Issue] で、 [テンプレートの設定] をクリックします。 [issue] を有効にしてページを更新しないとボタンが表示されない場合があります。
![タブを示すリポジトリ ヘッダーのスクリーンショット。 [設定] タブが濃いオレンジ色の枠線で強調表示されています。](https://github.github.com/docs-ghes-3.10/assets/cb-28260/mw-1440/images/help/repository/repo-actions-settings.webp)
![リポジトリの設定の [機能] セクションのスクリーンショット。[問題] 設定がチェックされ、緑色の [テンプレートの設定] ボタンが表示されています。](https://github.github.com/docs-ghes-3.10/assets/cb-58394/mw-1440/images/help/repository/set-up-issue-templates-button.webp)
-
[テンプレートの追加] ドロップダウンメニューで、作成するテンプレートの種類をクリックします。
![[Add template] ドロップダウン メニューが展開され、標準テンプレートの [Bug report] と [Feature request]、[Custom template] が表示されているスクリーンショット。](https://github.github.com/docs-ghes-3.10/assets/cb-30334/images/help/repository/add-template-drop-down-menu.png)
-
テンプレートをリポジトリにコミットする前にプレビューまたは編集するには、テンプレートの横にある [プレビューと編集] をクリックします。
-
テンプレートを編集するには、 をクリックし、フィールドに入力してコンテンツを編集します。

-
既定の issue タイトルを自動設定するには、リポジトリに読み取りアクセスできるユーザーに issue を割り当てるか、テンプレートから作られた issue にラベルを適用するか、[任意の追加情報] の下にあるフィールドを使いします。 これらの詳細は、Issue テンプレートで YAML frontmatter 形式の
title、labels、またはassigneesで追加することもできます。 -
テンプレートの編集とプレビューが終了したら、ページ右上隅にある [変更の提案] をクリックします。
-
"コミット メッセージ" フィールドに、変更について説明するコミット メッセージを入力します。
-
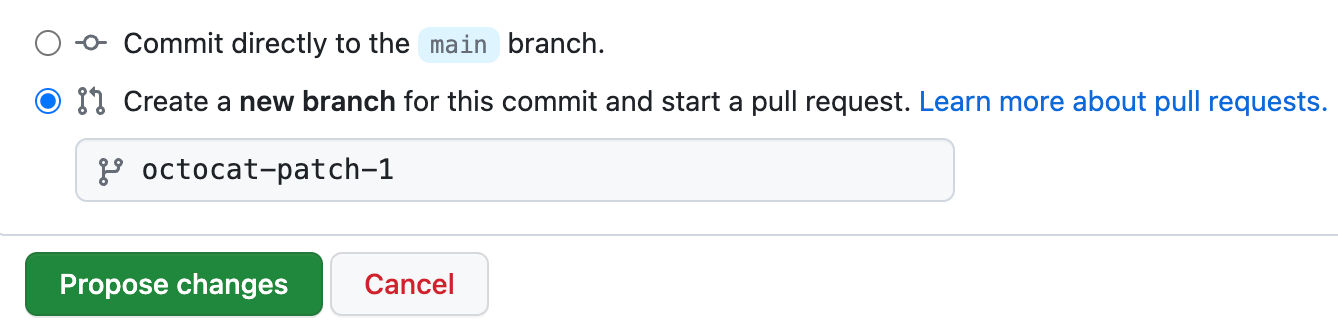
"コミット メッセージ" フィールドの下で、既定のブランチに直接テンプレートをコミットするか、新しいブランチを作成して pull request を開くかを選びます。 Pull request について詳しくは、「pull requests について」をご覧ください。
-
[Commit changes] をクリックします。 変更がデフォルトブランチにマージされると、コントリビューターがリポジトリで新しい Issue を開くときにテンプレートを使用できるようになります。
![[Add template] ドロップダウン メニューが展開され、標準テンプレートの [Bug report] と [Feature request]、[Custom template] が表示されているスクリーンショット。](https://github.github.com/docs-ghes-3.10/assets/cb-30334/mw-1440/images/help/repository/add-template-drop-down-menu.webp)

Issue フォームを作成する
Note
Issue フォームは現在 ベータ 段階であり、変更される可能性があります。
Issue フォームを使用すると、カスタマイズ可能な Web フォームフィールドを持つ Issue テンプレートを作成できます。 リポジトリ内の Issue フォームを使用して、コントリビューターに特定の構造化された情報を含めるように促すことができます。 Issue フォームは、GitHub フォームスキーマを使用して YAML で記述されます。 詳しくは、「GitHub のフォームスキーマの構文」をご覧ください。 YAML の初心者で詳しく学びたい場合は、「Learn YAML in Y minutes」(YAML を Y 分で学ぶ) を参照してください。
リポジトリで Issue フォームを使用するには、新しいファイルを作成して、それをお使いのリポジトリの .github/ISSUE_TEMPLATE フォルダーに追加する必要があります。
Issue フォームの設定ファイルの例を次に示します。
name: Bug Report
description: File a bug report.
title: "[Bug]: "
labels: ["bug", "triage"]
assignees:
  - octocat
body:
  - type: markdown
    attributes:
      value: |
        Thanks for taking the time to fill out this bug report!
  - type: input
    id: contact
    attributes:
      label: Contact Details
      description: How can we get in touch with you if we need more info?
      placeholder: ex. email@example.com
    validations:
      required: false
  - type: textarea
    id: what-happened
    attributes:
      label: What happened?
      description: Also tell us, what did you expect to happen?
      placeholder: Tell us what you see!
      value: "A bug happened!"
    validations:
      required: true
  - type: dropdown
    id: version
    attributes:
      label: Version
      description: What version of our software are you running?
      options:
        - 1.0.2 (Default)
        - 1.0.3 (Edge)
    validations:
      required: true
  - type: dropdown
    id: browsers
    attributes:
      label: What browsers are you seeing the problem on?
      multiple: true
      options:
        - Firefox
        - Chrome
        - Safari
        - Microsoft Edge
  - type: textarea
    id: logs
    attributes:
      label: Relevant log output
      description: Please copy and paste any relevant log output. This will be automatically formatted into code, so no need for backticks.
      render: shell
  - type: checkboxes
    id: terms
    attributes:
      label: Code of Conduct
      description: By submitting this issue, you agree to follow our [Code of Conduct](https://example.com).
      options:
        - label: I agree to follow this project's Code of Conduct
          required: true
Issueフォームのレンダリングバージョンは次のとおりです。

- Issue フォームを作成するリポジトリを選択します。 書き込みアクセス権を持つ既存のリポジトリを利用することも、新しいリポジトリを作成することもできます。 リポジトリの作成について詳しくは、「新しいリポジトリの作成」をご覧ください。
- リポジトリで、
FORM-NAMEを Issue フォームの名前に置き換えて、.github/ISSUE_TEMPLATE/FORM-NAME.ymlという名前のファイルを作成します。 GitHub での新しいファイルの作成について詳しくは、「新しいファイルの作成」をご覧ください。 - 新しいファイルの本文に、Issue フォームの内容を入力します。 詳しくは、「Issue フォームの構文」をご覧ください。
- ファイルをリポジトリのデフォルトブランチにコミットします。 詳しくは、「新しいファイルの作成」をご覧ください。
テンプレート選択画面を設定する
リポジトリで新しい Issue を作成する時に表示される Issue テンプレートの選択画面をカスタマイズするには、.github/ISSUE_TEMPLATE フォルダーに config.yml ファイルを追加します。
false に blank_issues_enabled を設定して、コントリビューターに Issue テンプレートの使用を促すことができます。 blank_issues_enabled を true に設定すると、空の Issue を開くオプションがユーザーに表示されます。
Note
従来のワークフローを使って .github フォルダーに issue_template.md ファイルを手動で作成し、config.yml ファイルで空の issue を有効にした場合は、空の issue を開くことを選択すると issue_template.md のテンプレートが使用されます。 空白の Issue を無効にすると、テンプレートは使用されません。
GitHub 以外で特定のレポートを受け取る場合は、contact_links を使ってユーザーを外部サイトに誘導できます。
config.yml ファイルの例を次に示します。
blank_issues_enabled: false
contact_links:
  - name: GitHub Community Support
    url: https://github.com/orgs/community/discussions
    about: Please ask and answer questions here.
  - name: GitHub Security Bug Bounty
    url: https://bounty.github.com/
    about: Please report security vulnerabilities here.
設定ファイルでは、ファイルがリポジトリのデフォルトブランチにマージされるときにテンプレート選択画面をカスタマイズします。
-
GitHub で、リポジトリのメイン ページに移動します。
-
ファイルの一覧の上にある、 [ファイルの追加] ドロップダウンを使用し、 [新しいファイルの作成] をクリックします。
-
ファイル名フィールドに、
.github/ISSUE_TEMPLATE/config.ymlと入力します。 -
新しいファイルの本文に、設定ファイルのコンテンツを入力します。
-
[コミット メッセージ] フィールドに、ファイルに対する変更内容を説明する、短くわかりやすいコミット メッセージを入力します。 コミットメッセージでは、複数の作者にコミットを関連づけることができます。 詳しくは、「複数の作者を持つコミットを作成する」をご覧ください。
-
コミットメッセージフィールドの下で、コミットの追加先を現在のブランチか新しいブランチから選択してください。 現在のブランチがデフォルトブランチなら、コミット用に新しいブランチを作成してからPull Requestを作成すべきです。 詳しくは、「pull request の作成」をご覧ください。
-
[変更のコミット] または [変更の提案] をクリックします。

テンプレートの順序を変更する
テンプレートのファイル名を変更することで、問題テンプレートをテンプレート セレクタに表示する順序を設定できます。 .github/ISSUE_TEMPLATE のテンプレートは英数字順で一覧表示され、ファイルの種類別にグループ化され、マークダウン ファイルの前に YAML ファイルが表示されます。
テンプレートの順序を制御するには、ファイル名の前に数字を付けます。 たとえば、1-bug.yml、2-feature-request.yml、3-epic.yml のようにします。
10 個以上のテンプレートがある場合、英数字の順序は、11-bug.yml が 1-feature.yml と 2-support.yml の間に配置されることを意味します。 数字のファイル名の前に追加の 0 を付けることで、意図した順序を維持できます。 たとえば、01-feature.yml、02-support.yml、11-bug.yml のようにします。