Nota:
Actualmente los ejecutores hospedados por GitHub Enterprise Server no se admiten en GitHub.
Introducción
GitHub Actions es una plataforma de integración y despliegue continuos (IC/DC) que te permite automatizar tu mapa de compilación, pruebas y despliegue. Puedes crear flujos de trabajo que ejecuten pruebas cada vez que introduzcas un cambio en tu repositorio o que despleguen solicitudes de cambios fusionadas a producción.
En esta guía de inicio rápido se muestra cómo usar la interfaz de usuario de GitHub para agregar un flujo de trabajo que muestre algunas de las características esenciales de GitHub Actions.
Para empezar a trabajar con flujos de trabajo preconfigurados, examine la lista de plantillas del repositorio actions/starter-workflows. Para más información, consulta Uso de plantillas de flujo de trabajo.
Para ver una introducción sobre los flujos de trabajo de GitHub Actions, consulta Flujos de trabajo. Si deseas obtener información sobre los distintos componentes que forman GitHub Actions, consulta Descripción de GitHub Actions.
Uso de plantillas de flujo de trabajo
GitHub proporciona plantillas de flujo de trabajo preconfiguradas que puedes usar tal cual o bien personalizar para crear un flujo de trabajo propio. GitHub analiza el código y muestra plantillas de flujo de trabajo que podrían ser útiles para el repositorio. Por ejemplo, si tu repositorio contiene un código Node.js, verás sugerencias para los proyectos de Node.js.
Estas plantillas de flujo de trabajo están diseñadas para ayudarle a ponerse en marcha rápidamente, y ofrecen una variedad de configuraciones como las siguientes:
- CI: flujos de trabajo de integración continua
- Implementaciones: flujos de trabajo de implementación
- Automatización: flujos de trabajo de Automatización
- Examen de código: flujos de trabajo de examen de código
- Páginas: flujos de trabajo de páginas
Puede utilizar plantillas de flujo de trabajo como punto de partida para crear el flujo de trabajo personalizado, o bien utilizarlas tal cual. Puede examinar la lista completa de plantillas de flujo de trabajo en el repositorio actions/starter-workflows.
Requisitos previos
En esta guía se da por supuesto que:
-
Tienes al menos conocimientos básicos sobre cómo usar GitHub. Si no es así, te resultará útil leer algunos de los artículos de la documentación de repositorios y solicitudes de incorporación de cambios primero. Por ejemplo, consulta Inicio rápido para repositorios, Acerca de las ramas, y Acerca de las solicitudes de incorporación de cambios.
-
Tienes un repositorio en GitHub donde puedes agregar archivos.
-
Tienes acceso a GitHub Actions.
Nota:
Si la pestaña Acciones no se muestra bajo el nombre del repositorio en GitHub, puede deberse a que las Acciones están deshabilitadas para el repositorio. Para más información, consulta Administración de la configuración de GitHub Actions para un repositorio.
Crear tu primer flujo de trabajo
-
En el repositorio de GitHub, crea un archivo de flujo de trabajo llamado
github-actions-demo.ymlen el directorio.github/workflows. Para ello, siga estos pasos:-
Si el directorio
.github/workflowsya existe, ve a ese directorio en GitHub, haz clic en Agregar archivo y, a continuación, haz clic en Crear nuevo archivo y asigna al archivo el nombregithub-actions-demo.yml. -
Si el repositorio no tiene un directorio
.github/workflows, ve a la página principal del repositorio en GitHub, haz clic en Agregar archivo, haz clic en Crear nuevo archivo y asigna el nombre al archivo.github/workflows/github-actions-demo.yml. Esto crea los directorios.githubyworkflowsy el archivogithub-actions-demo.ymlen un solo paso.
Nota:
Para que GitHub detecte los flujos de trabajo de GitHub Actions en el repositorio, debes guardar los archivos de flujo de trabajo en un directorio denominado
.github/workflows.Puedes asignar al archivo de flujo de trabajo cualquier nombre que desees, pero debes usar
.ymlo.yamlcomo extensión de nombre de archivo. YAML es un lenguaje de marcado que se usa normalmente para los archivos de configuración. -
-
Copia el siguiente contenido de YAML en el archivo
github-actions-demo.yml:YAML name: GitHub Actions Demo run-name: ${{ github.actor }} is testing out GitHub Actions 🚀 on: [push] jobs: Explore-GitHub-Actions: runs-on: ubuntu-latest steps: - run: echo "🎉 The job was automatically triggered by a ${{ github.event_name }} event." - run: echo "🐧 This job is now running on a ${{ runner.os }} server hosted by GitHub!" - run: echo "🔎 The name of your branch is ${{ github.ref }} and your repository is ${{ github.repository }}." - name: Check out repository code uses: actions/checkout@v6 - run: echo "💡 The ${{ github.repository }} repository has been cloned to the runner." - run: echo "🖥️ The workflow is now ready to test your code on the runner." - name: List files in the repository run: | ls ${{ github.workspace }} - run: echo "🍏 This job's status is ${{ job.status }}."name: GitHub Actions Demo run-name: ${{ github.actor }} is testing out GitHub Actions 🚀 on: [push] jobs: Explore-GitHub-Actions: runs-on: ubuntu-latest steps: - run: echo "🎉 The job was automatically triggered by a ${{ github.event_name }} event." - run: echo "🐧 This job is now running on a ${{ runner.os }} server hosted by GitHub!" - run: echo "🔎 The name of your branch is ${{ github.ref }} and your repository is ${{ github.repository }}." - name: Check out repository code uses: actions/checkout@v6 - run: echo "💡 The ${{ github.repository }} repository has been cloned to the runner." - run: echo "🖥️ The workflow is now ready to test your code on the runner." - name: List files in the repository run: | ls ${{ github.workspace }} - run: echo "🍏 This job's status is ${{ job.status }}."En esta fase no es necesario comprender los detalles de este flujo de trabajo. Por ahora, puedes copiar y pegar el contenido en el archivo. Después de completar esta guía de inicio rápido, puedes obtener información sobre la sintaxis de los archivos de flujo de trabajo en Flujos de trabajo y para obtener una explicación de los contextos de GitHub Actions, como
${{ github.actor }}y${{ github.event_name }}, consulta Contextos de referencia. -
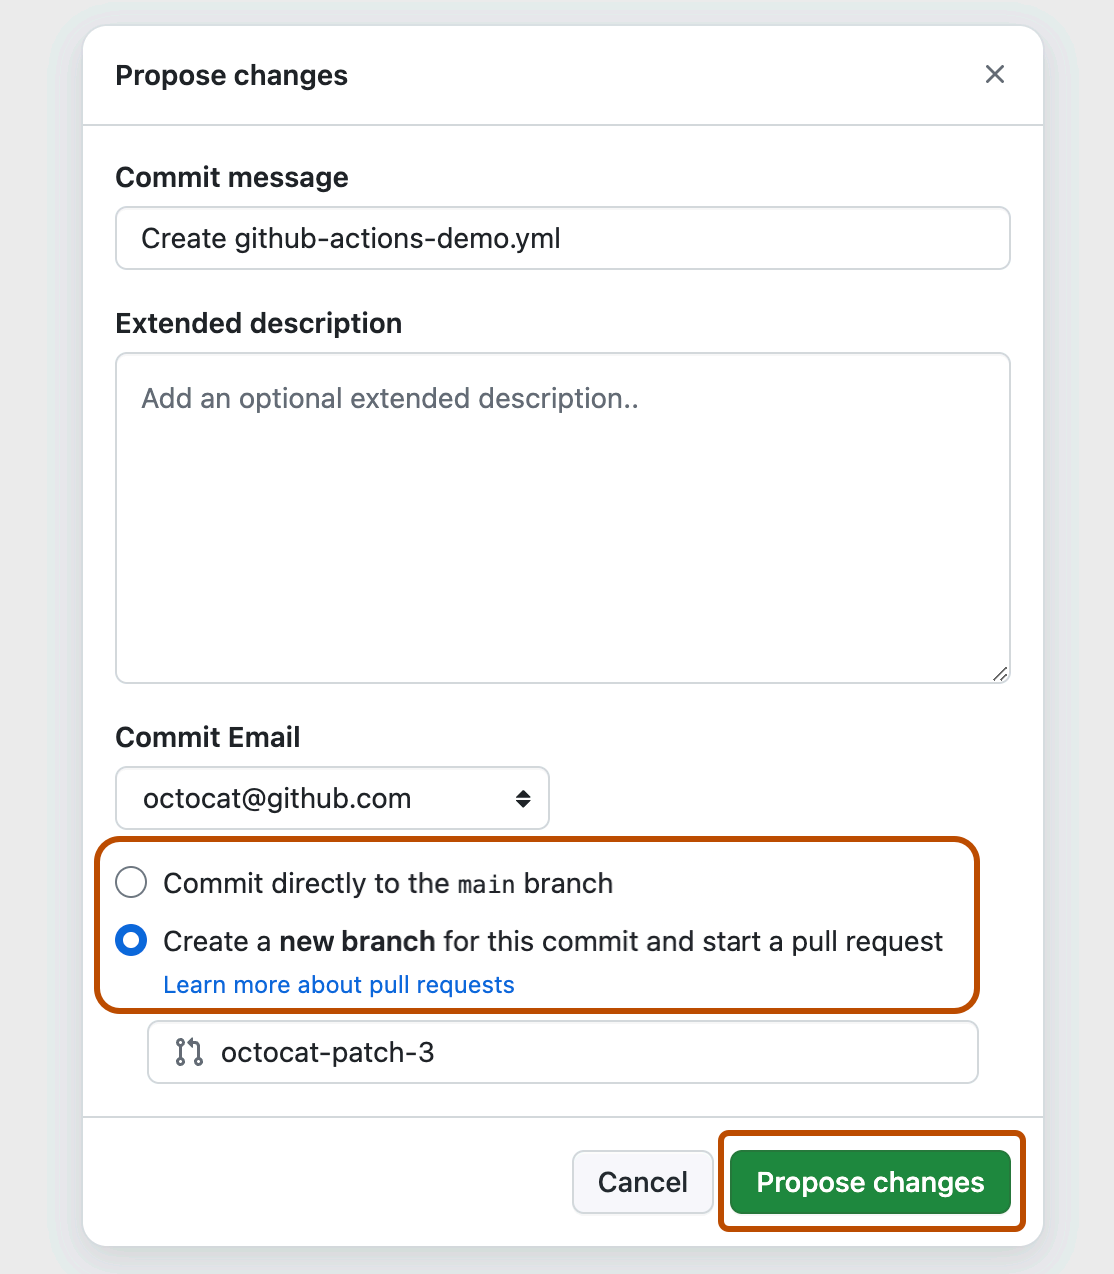
Haga clic en Commit changes (Confirmar cambios).
-
En el cuadro de diálogo «Proponer cambios», selecciona la opción para confirmar en la rama predeterminada o la opción para crear una nueva rama e iniciar una solicitud de incorporación de cambios. Luego, haz clic en Confirmar cambios o Proponer cambios.

Al confirmar el archivo de flujo de trabajo en una rama de su repositorio, se desencadena el evento push y se ejecuta su flujo de trabajo.
Si decides iniciar una solicitud de incorporación de cambios, puedes continuar y crear la solicitud de incorporación de cambios, pero esto no es necesario para los fines de este inicio rápido, porque la confirmación todavía se ha realizado en una rama y desencadenará el nuevo flujo de trabajo.
Ver los resultados de tu flujo de trabajo
-
En GitHub, navegue hasta la página principal del repositorio.
-
En el nombre del repositorio, haz clic en Actions.

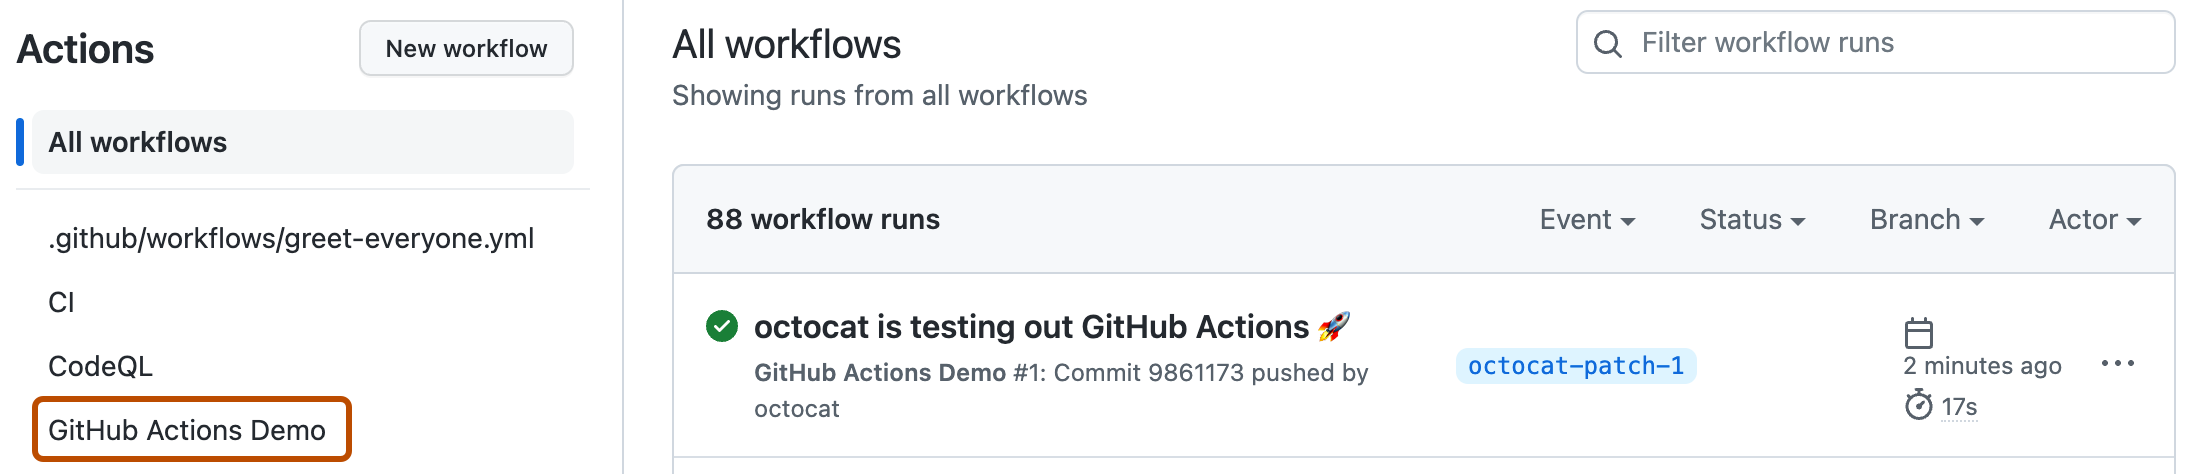
-
En la barra lateral izquierda, haga clic en el flujo de trabajo que desea mostrar, en este ejemplo "GitHub Actions Demostración".
-
En la lista de ejecuciones de flujo de trabajo, haga clic en el nombre de la ejecución que desea ver, en este ejemplo "USERNAME está probando GitHub Actions".
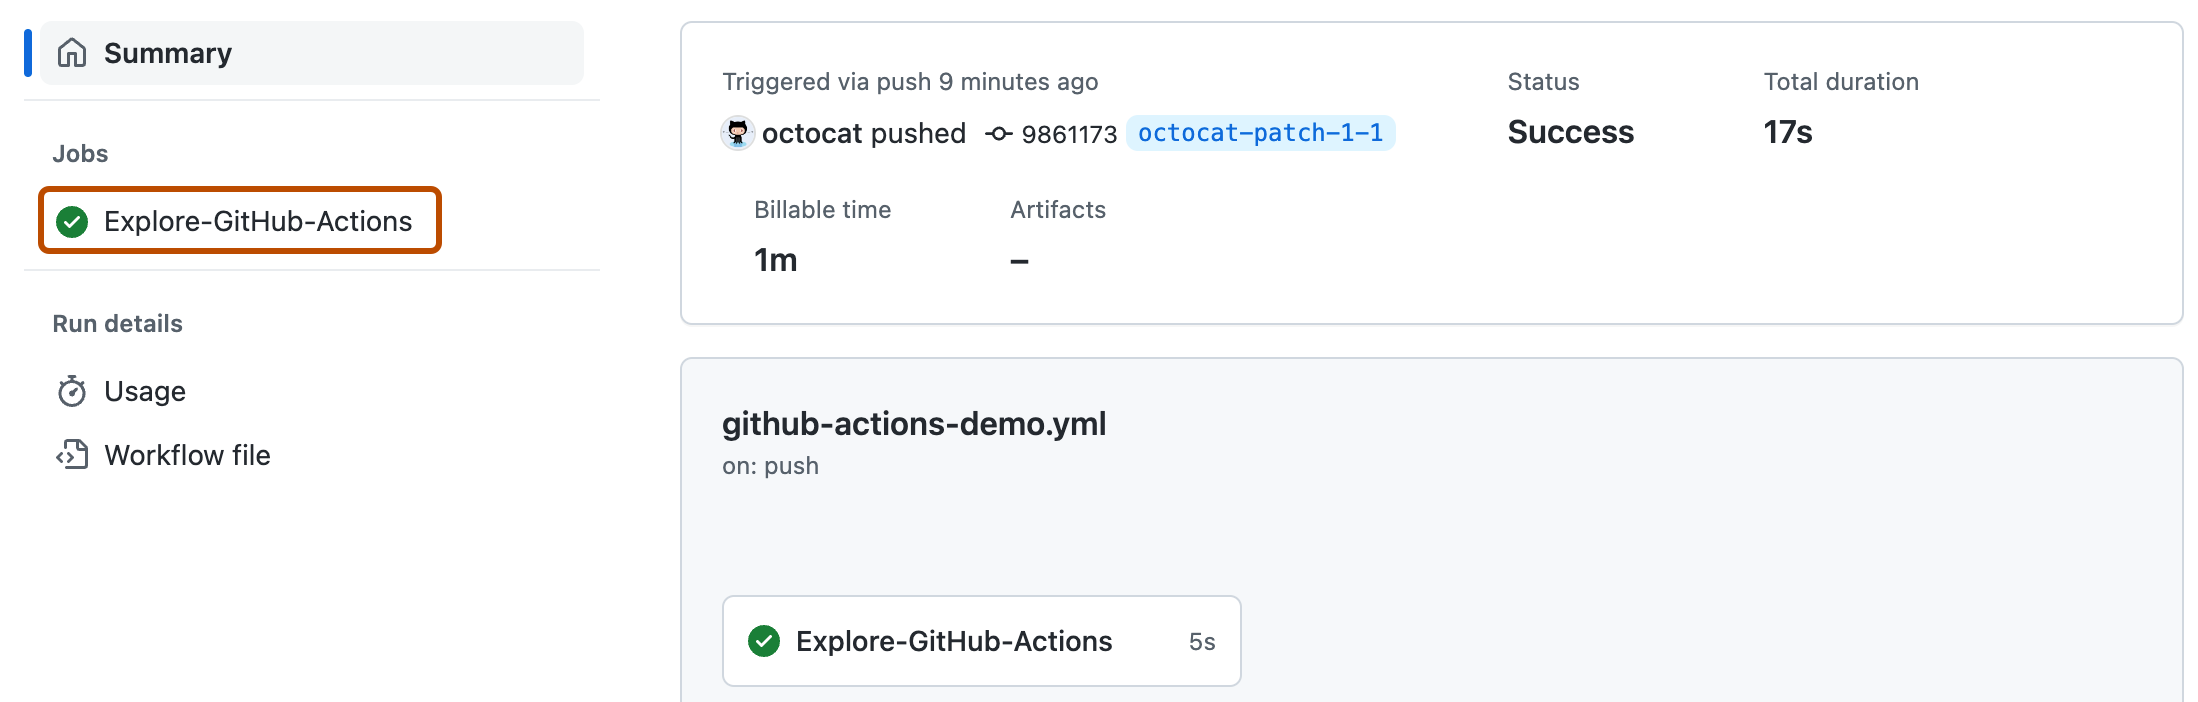
-
En la barra lateral izquierda de la página de ejecución del flujo de trabajo, en Jobs, haga clic en el trabajo Explore-GitHub-Actions.
-
La bitácora muestra cómo se procesó cada uno de los pasos. Expande cualquiera de los pasos para ver sus detalles.
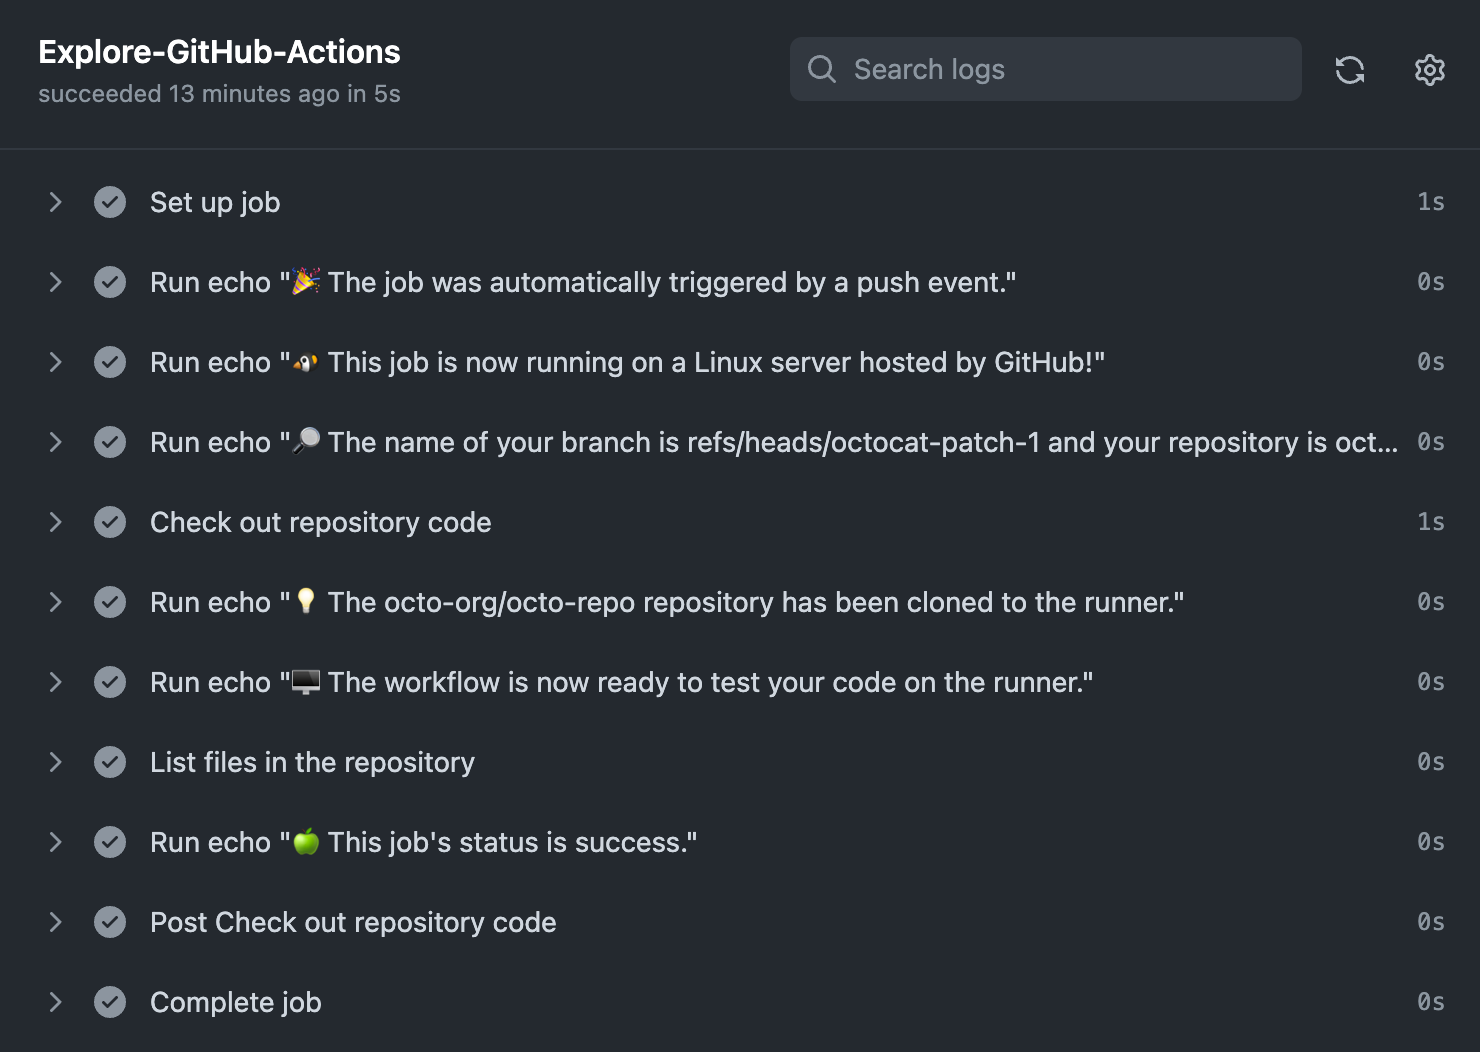
Por ejemplo, puedes ver la lista de archivos en tu repositorio:
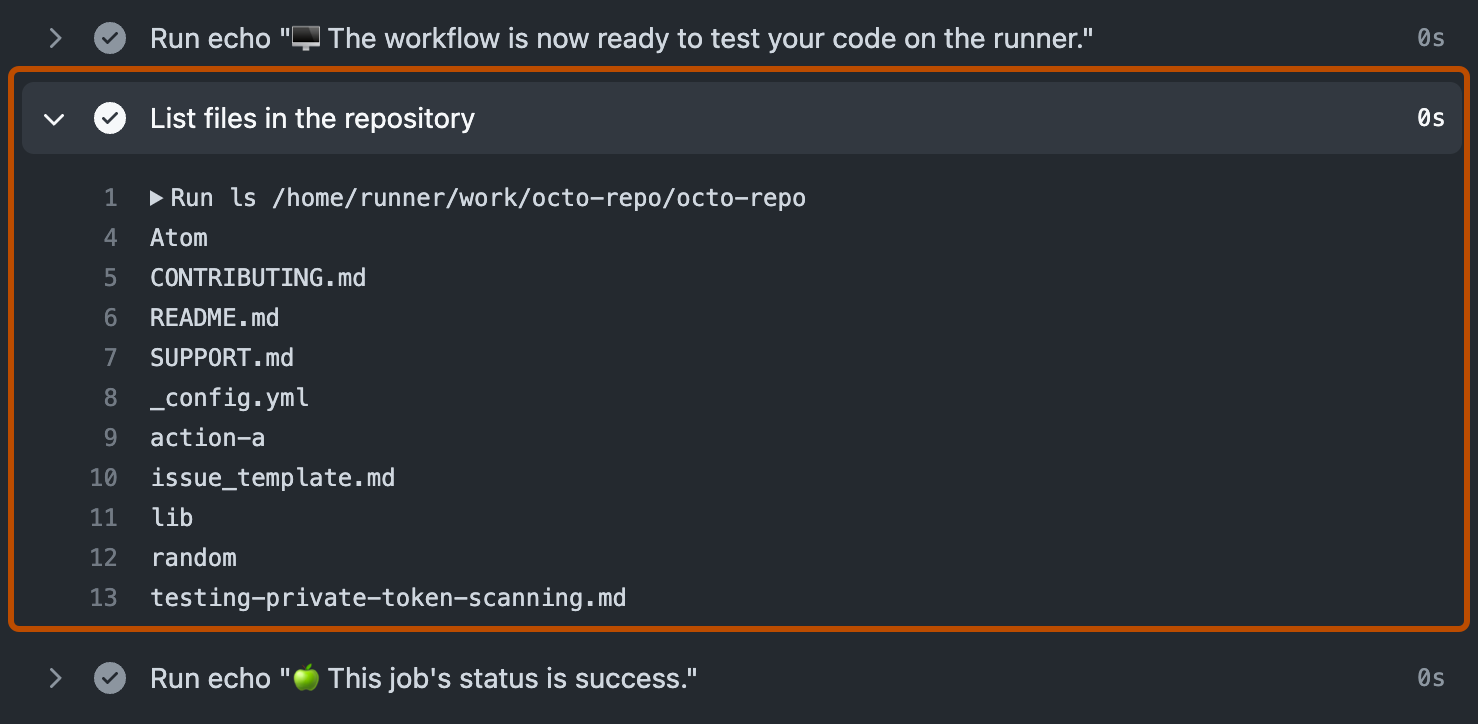


El flujo de trabajo de ejemplo que acabas de agregar se desencadena cada vez que se inserta código en la rama y te muestra cómo pueden funcionar las GitHub Actions con el contenido de tu repositorio. Para ver un tutorial detallado, consulta Descripción de GitHub Actions.
Pasos siguientes
GitHub Actions puede ayudarte a automatizar casi cualquier aspecto de tus procesos de desarrollo de aplicaciones. ¿Ya está listo para comenzar? Aquí tienes algunos recursos útiles para que tomes tus siguientes pasos con GitHub Actions:
- Para crear un flujo de trabajo de GitHub Actions, vea Uso de plantillas de flujo de trabajo.
- Para obtener flujos de trabajo de integración continua (CI), vea Construir y probar tu código.
- Para compilar y publicar paquetes, consulte Publicación de paquetes.
- Para implementar proyectos, consulte Implementación en plataformas de terceros.
- Para automatizar tareas y procesos en GitHub, consulte Administración del trabajo con Acciones de GitHub.
- Para obtener ejemplos que demuestran características más complejas de GitHub Actions, vea Administración del trabajo con Acciones de GitHub. En estos ejemplos detallados se explica cómo probar el código en un ejecutor, acceder a la CLI de GitHub y usar características avanzadas, como la simultaneidad y las matrices de prueba.